Experiment: Data Analysis From Crowd-Sourcing of Indonesian Election Votes Using PowerBI

Disclaimer: this post is solely for experimental purpose without any intention to support any side of the political group. The data source used in this experiment is based on crowd-sourcing effort based on the official data, any error or misuse of the data solely based on the combination of effort from crowd sourcing. The author of this blog completely neutral and does not have any attempt to highlight any party. Important: this is not official page of Indonesian Election Commission.

My home country is currently waiting for the final outcome of their presidential election. The official result and data is going to be announced in 22th July 2014. With the transparency in the Indonesian government that released the scanned copy of the official counting in their official website: http://pilpres2014.kpu.go.id/ triggered the initiation of some local IT experts to develop open-source crowd-sourcing platforms such as: http://kawalpemilu.org/#0, http://kawal-suara.appspot.com/ and http://rekapda1.herokuapp.com/ to consolidate the data from thousands of voting booths.

With the availability of the data from these platforms combined with Excel’s PowerBI capability I experimented to extract the data of the votes and analyse the result and distribution of the votes based on each provinces.

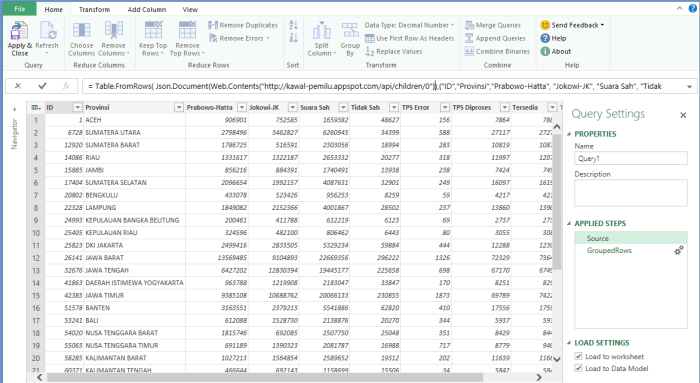
To start with this analysis, I did a bit of inspection on http://kawalpemilu.org/script to get their data feed and make it the data source in PowerQuery.

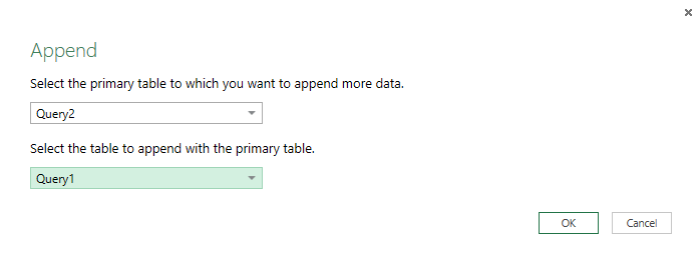
To achieve the comparison between the two candidates, I need to create 2 separate queries for each candidates and combine the query using append functionality.

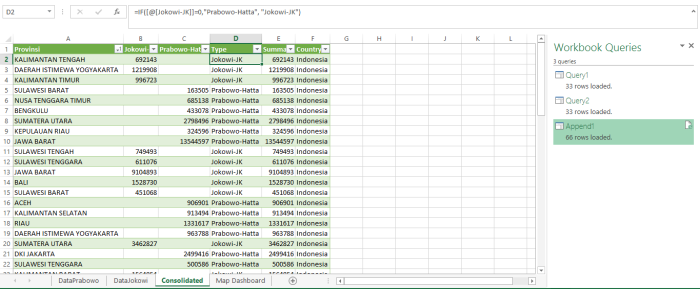
That resulting the consolidated query with the comparison of the total votes for each candidates. With a simple excel formula, I create Type column to be used in PowerView map as key of the candidates.

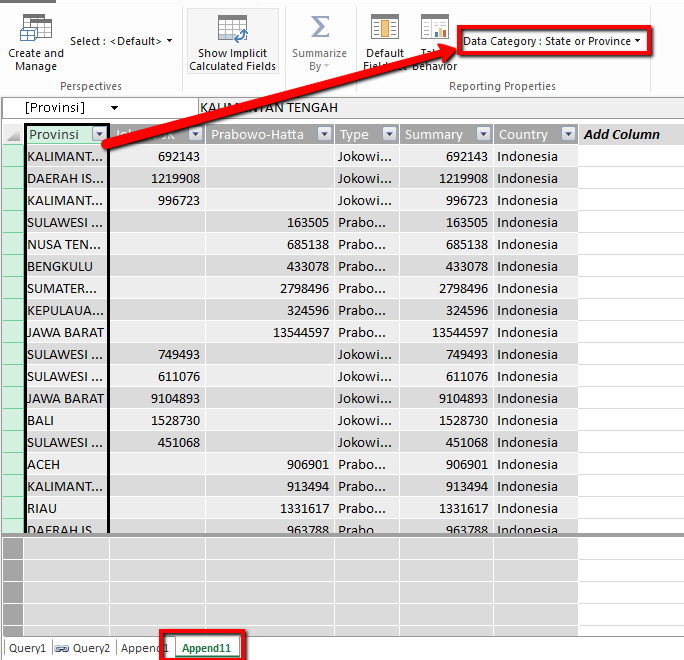
Now I have the required data to generate the PowerView distribution map. However before the data becomes usable for Map control in PowerView, I need to change the Province and Country column behaviour as geographic data using PowerPivot.

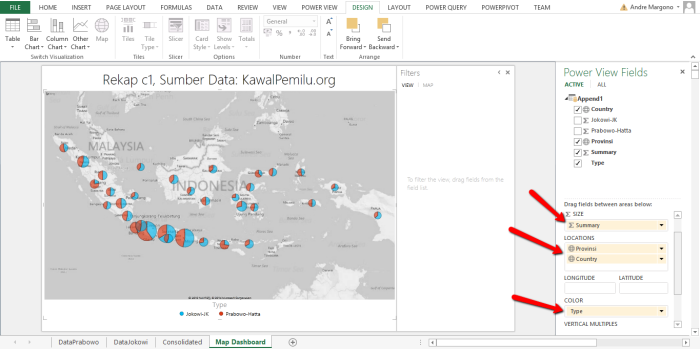
Now the data is ready to be used in Map control in PowerView. To create the PowerView, navigate to Insert > Reports > PowerView in Excel ribbon bar.

With minor configuration the geographical distribution is displayed on PowerView Map.

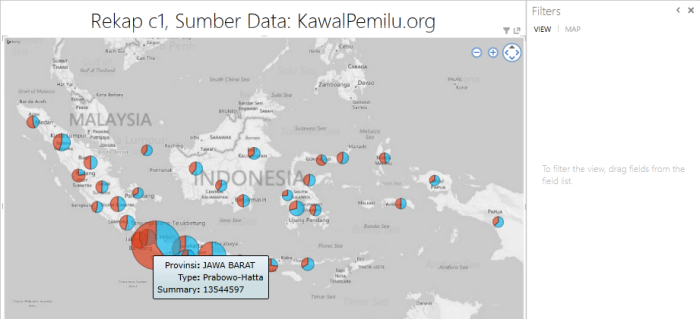
With the detail of distribution of the votes on each candidates based on the geographical location:

The source Excel file is available here: KawalSuaraDashboard

I pray that the final outcome can be announced without any commotion next week.

Conclusion

PowerBI with Excel is really useful to generate geographical representation of the data. Obviously this is really useful in CRM world to get customers, competitors and partners data visualisation.


Microsoft Dynamics CRM 2013 Update Rollup 3 is Released

Microsoft just released Update Rollup 3 for Dynamics CRM 2013. 

KB Article: http://support.microsoft.com/kb/2930480

Download Link: http://www.microsoft.com/en-us/download/details.aspx?id=43665

This update rollup is specific only for Dynamics CRM 2013 deployment that has not installed SP1 updates.

The strategy of update rollup implementation post SP1 updates is well written here: http://crmtipoftheday.com/2014/06/10/update-rollup-strategy-post-sp1/

Excerpt from the KB Article:

Important notes

  • If Update Rollup 3 is applied, we recommend that you wait until Update Rollup 1 for Microsoft Dynamics CRM 2013 Service Pack 1 (SP1) is available before you upgrade to the Service Pack 1 release stream. This is because Update Rollup 3 may contain fixes that are not included in Microsoft Dynamics CRM 2013 SP1.


Enable Dynamics CRM oData Query Filter for PowerQuery Performance

Recently I’ve been experimenting with the PowerBI and Excel self-service BI for Dynamics CRM, which has been discussed by CRM MVP Jukka Niiranen on: http://niiranen.eu/crm/2013/12/connecting-crm-online-odata-feed-excel-2013-power-query/ and PowerBI’s blog: http://blogs.msdn.com/b/powerbi/archive/2013/12/19/dynamics-crm-online-in-power-query.aspx last year.

Last Tuesday on Melbourne CRM User Group, Rowan Miller also excellently presented the functionality with localised content (Australian geographical data): http://www.meetup.com/MelCRMUG/events/170962872/

One thing that annoys me is the performance when connecting to CRM web service: https://(CRMServer)/xrmservices/2011/OrganizationData.svc where this endpoint will return all entities that can be queried, thus the performance of each refresh and initiation is absorbed.

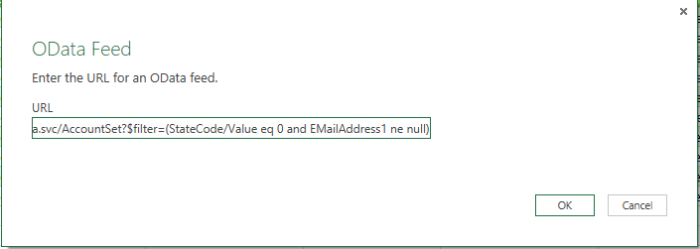
Out of my experiment, theoretically if it could retrieve the data through the oData endpoint, it should be able to get the data after the filter. So, I tried to retrieve the data using the oData filter, e.g: 

https://(CRMServer)/xrmservices/2011/OrganizationData.svc/AccountSet?$filter=(StateCode/Value eq 0 and EMailAddress1 ne null) to get the Active accounts and has email address. Additionally, we could include which fields that need to be retrieved.

The performance of early initiation and data refresh is improved, as the query is handled through the oData query level, instead of pulling all data using PowerQuery.

As always, the best tool to build oData query is: oData Query Designer by CRM MVP Rhett Clinton: http://dynamicsxrmtools.codeplex.com/

Tips: How to Display Entity Image on CRM Form

Entity Image is introduced Dynamics CRM 2013. This is a really useful feature where we could have better presentation to quickly glance on the record. As the adage says: “A picture is worth a thousand words”.

It seems quite common requirements for customizing the form, but it is not automatically enabled on the form. To get the entity image to be displayed on the form:

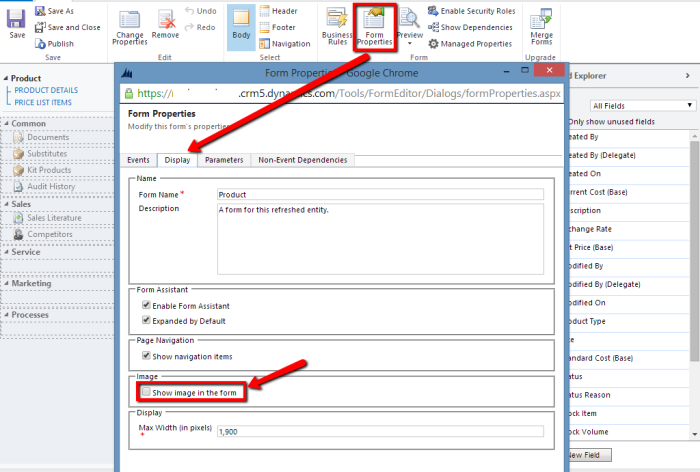
Navigate to the entity form customization > Form Properties > Display tab > check the “Show image in the form” option > Click OK > Save and publish the customization.

This is a really basic and simple customization, however I keep forgetting the options as I’m mostly working on CRM 2011 projects at this moment.

I hope this helps fellow system customizers/developers.

Findings on Sdk.Soap.js Action Message and Entity Class Generator

Microsoft Dynamics CRM SDK team released the Sdk.Soap.js to write JavaScript code in web resources that can perform actions using theMicrosoft Dynamics CRM 2013 Modern App SOAP endpoint. You can use this library in with web resources.
http://code.msdn.microsoft.com/SdkSoapjs-9b51b99a
The extension of the Sdk.Soap.js is Action Message Generator:
http://code.msdn.microsoft.com/SdkSoapjs-Action-Message-971be943
And Entity Class Generator:
http://code.msdn.microsoft.com/SdkSoapjs-Entity-Class-14ca830f
That really useful in creating early-binding type of development for Dynamics CRM.

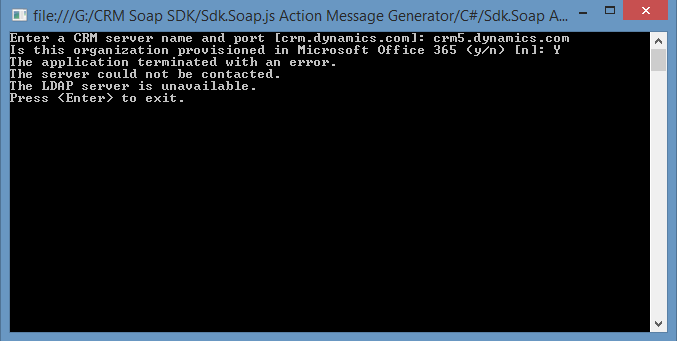
I followed through the instruction for the Action Message Generator to connect to Dynamics CRM Online instance. I follow exactly each steps that the instruction described, however I got the following error:

The application terminated with an error.The server could not be contacted.the LDAP server is unavailable.

Initially I was quite confused with the error message, as I did not change any part of the SDK sample code at all. So, I decided to debug the code and I found out that the exception was coming from the lines that were trying to authenticate with the current UserPrincipalName with PrincipalServerDownException. The reason I got the above error is:

  1. My computer is joined to a my company’s domain, and the I’m logged in to the computer as a domain account. However, the DC is unavailable. (I’m off the domain; working on home network)
  2. I’m on the domain. However, I’m in a multiple-domain environment in which the LDAP query service is on an inaccessible domain. (firewall rules on WiFi connection).


So, to fix this issue I modified the sample SDK code that apparently utilising the same CrmServiceHelpers class from the Quick Start guide (http://msdn.microsoft.com/en-us/library/hh675400.aspx); from:

// For OnlineFederation environments, initially try to authenticate with the current UserPrincipalName// for single sign-on scenario.else if (config.EndpointType == AuthenticationProviderType.OnlineFederation && config.AuthFailureCount == 0 && !String.IsNullOrWhiteSpace(UserPrincipal.Current.UserPrincipalName)){ config.UserPrincipalName = UserPrincipal.Current.UserPrincipalName; return null;}// Otherwise request username and password.else{ config.UserPrincipalName = String.Empty; if (config.EndpointType == AuthenticationProviderType.LiveId) Console.Write("\n Enter Microsoft account: "); else Console.Write("\n Enter Username: "); userName = Console.ReadLine(); if (string.IsNullOrWhiteSpace(userName)) { return null; }Console.Write(" Enter Password: "); password = ReadPassword();}credentials.UserName.UserName = userName;credentials.UserName.Password = ConvertToUnsecureString(password);break; 

To:

// For OnlineFederation environments, initially try to authenticate with the current UserPrincipalName// for single sign-on scenario.else{ var isPrincipalServerDown = false; var currentUserPrincipalName = String.Empty; try { currentUserPrincipalName = UserPrincipal.Current.UserPrincipalName; } catch (PrincipalServerDownException) { isPrincipalServerDown = true; }if (config.EndpointType == AuthenticationProviderType.OnlineFederation && config.AuthFailureCount == 0 && !isPrincipalServerDown && !String.IsNullOrWhiteSpace(currentUserPrincipalName)) { config.UserPrincipalName = currentUserPrincipalName; return null; } // Otherwise request username and password. else { config.UserPrincipalName = String.Empty; if (config.EndpointType == AuthenticationProviderType.LiveId) Console.Write("\n Enter Microsoft account: "); else Console.Write("\n Enter Username: "); userName = Console.ReadLine(); if (string.IsNullOrWhiteSpace(userName)) { return null; }Console.Write(" Enter Password: "); password = ReadPassword(); }}credentials.UserName.UserName = userName;credentials.UserName.Password = ConvertToUnsecureString(password);break;

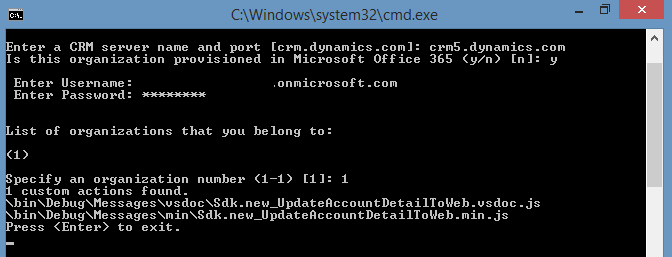
Now I’m able to generate the Custom Action that generated by the tool:

CRM On-Premise Sandbox Colour Scheme

A workmate in crime from Brisbane office, Gerhard Pretorius, recently posted an interesting tricks to change On-Premise Deployment with Sandbox Colour Scheme that currently only available on CRM Online:

To make an On-Premise CRM system display the “Sandbox Theme”, you will need to do some code…

Just a note – this is only available for CRM 2013 RU2 and up. THIS IS AN UNSUPPORTED CUSTOMISATION!

Edit the main.aspx file on the CRM server, this is usually located at C:\Program Files\Microsoft Dynamics CRM\CRMWeb\main.aspx. In the head section of main.aspx, after the title tag add the following tag (replace OrgName with your CRM Organisation name):

<script>

    if (ORG_UNIQUE_NAME == "OrgName") {
        var IS_SANDBOX_ORG = true;
    }

</script>


Restart the CRM Server / do an IIS Reset.

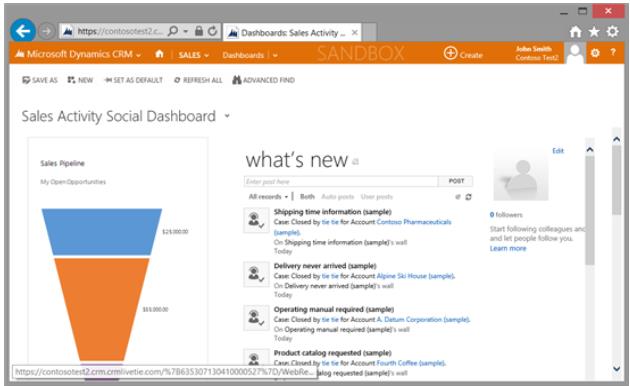
Only the sandbox instance will now show the orange “Sandbox Theme”. This is a great way for users to know which system they are in.

Bulk Execute On-Demand Workflow with Kingswaysoft SSIS

Recently I read a discussion in a mailing list on how to execute large number of on-demand workflow and out of curiosity, I tried to look for the method that was discussed, which uses Microsoft Dynamics CRM for Outlook as elaborated here:

http://www.powerobjects.com/blog/2013/07/30/run-on-demand-workflow-in-dynamics-crm-250-records/

I tried that method with 7000 records and apparently it took long time for me to finish the operation and makes my Outlook application not usable for long period. So, I think there should be another way to do this, as I was presenting the SSIS toolkit in the last Melbourne CRM UG, I recalled that there’s “Execute Workflow” functionality in Kingswaysoft’s SSIS toolkit.

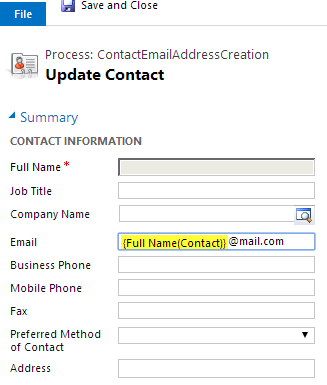
So out of my experiment, I set up a simple SSIS project to execute On-Demand Workflow on Contact record to give the value on email field:

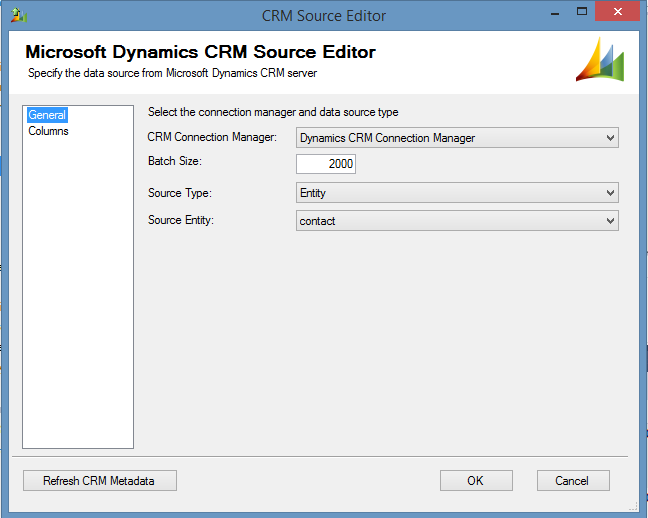
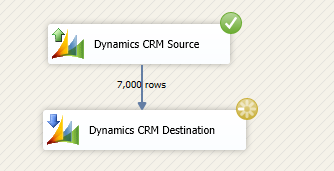
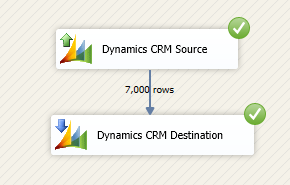
And create a simple SSIS process as follow:

1. Contact Data Source:

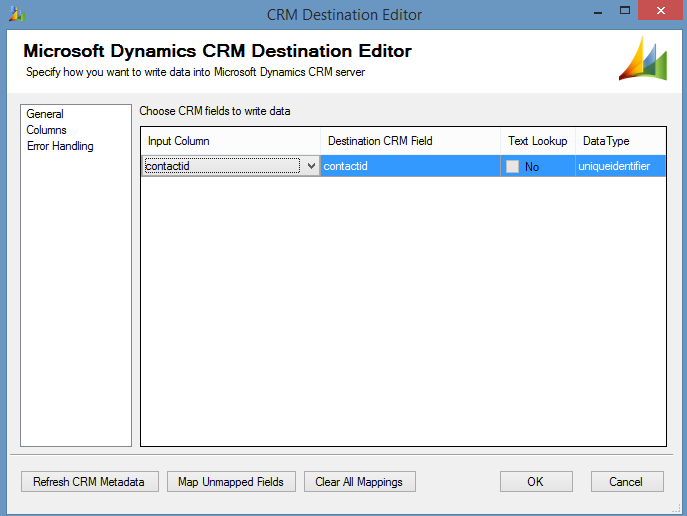
2. Destination To Execute Workflow with Batch Size of 200 (I learned this batch size from SF, where their bulk operation is limited in 200 for performace, unsure about Dynamics CRM)

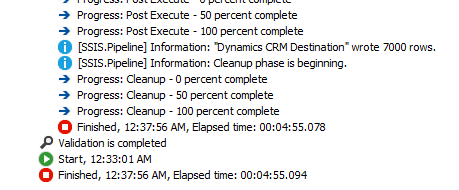
3. The Result

The whole operation that took hours when using Microsoft Outlook client, now accomplished within 4 minutes and 55 seconds (approximately 5 minutes)! It is accomplished with relatively simple and intuitive process.

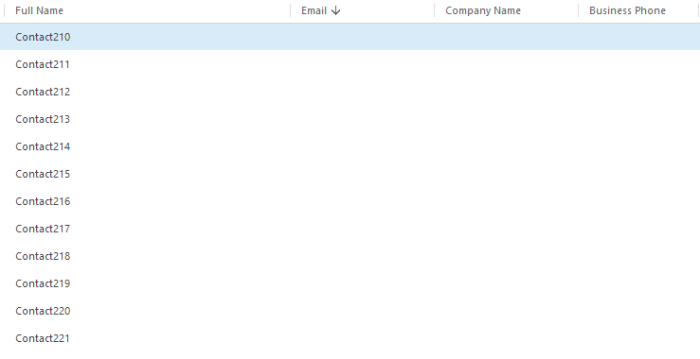
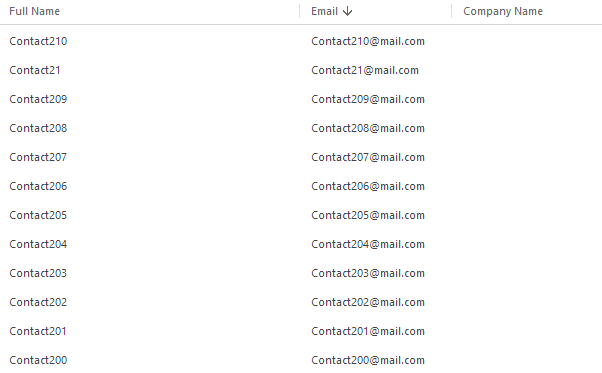
Below is the result on contact records:


Dynamics CRM 2013 SP1 – UX Update – Mostly Unnoticed

Dynamics CRM 2013 SP1 comes with lots of new good stuffs, such as the new Service Management, SLA, Timer on Case, Queue Routing, Social Listening and many more. However, for me as CRM user that always use PC and web browser to work with Dynamics CRM, the user experience for PC client quite cumbersome, especially the navigation bar that collapses immediately when my mouse pointer is navigated away from the bar. I love to have responsive mouse pointer and most of the time my mouse pointer goes out the navigation bar and closes the navigation bar, resulting multiple click to main navigation menu.

As my online instance being updated with Spring 14 release, I noticed an improvement in their UX. The navigation bar does not collapse immediately when my mouse pointer goes out of the bar.

This UX definitely gives a massive impact to my productivity. Big thanks to Dynamics CRM product team to listen to the feedback and delivered this feature!


Hello Dynamics CRM 4.0, Long Time no See

Today I started a project on a client that still use Dynamics CRM 4.0. It’s been a while since I developing and navigating through this wonderful CRM back from 2007-2008, when I was still in uni.

Getting accustomed to the great enhancement from Update Rollup 12 of Dynamics CRM 2011 (Cross-Browser capability), I felt a bit unproductive just to be able to use only IE. Again another problem, CRM 4.0 only supports up to IE 9 (ref: http://support.microsoft.com/kb/2669061) and my working machine is using IE 11.

So, for a better productivity working with pre-Dynamics CRM 2011 UR 12. I came up with a couple tips:

Tips#1: IE 11 Compatibility Mode

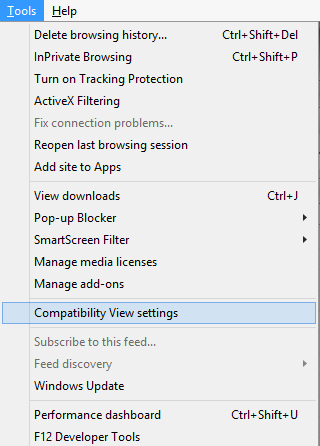
This is the basic requirement to work with CRM 4.0. To set this up on IE toolbar, click on Tools > Compatibility View Settings

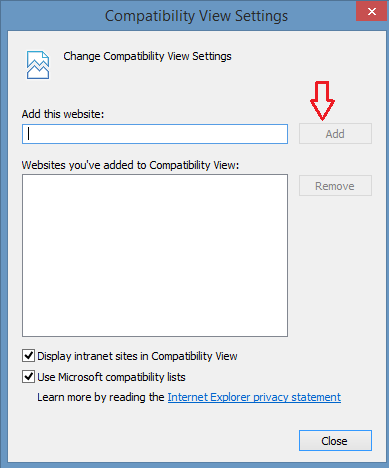
Then add the Web address of the CRM 4.0 server

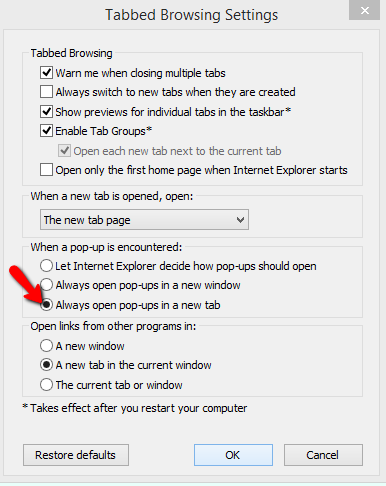
Tips# 2: Open Pop-Up Window in New Tab

Note: This method is still useful when working with Dynamics CRM 2011 as well.

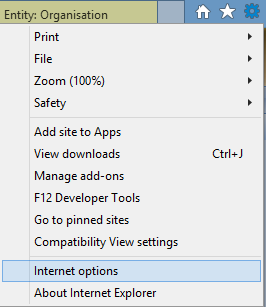
To enable this, click the “Gear” symbol on IE > Click on Internet Options

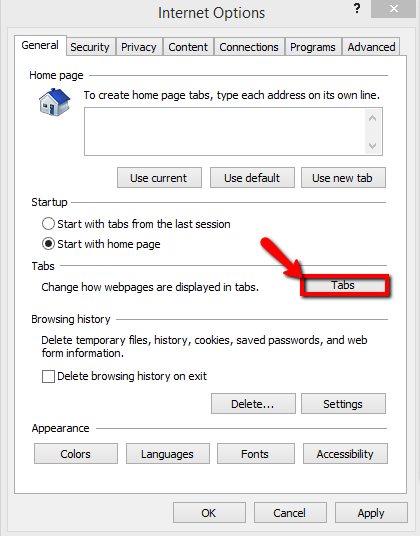
Under General Tab and under Tabs Section, click on Tabs button

Then under “When a pop-up is encountered:” Section, select “Always open pop-ups in a new tab

Tips #3. IE Tab on Google Chrome

When working with multiple organisations of Dynamics CRM, it’s inefficient to open everything using single browser. Especially when we need to do comparison between two different orgs. Alternative way is to install Google Chrome extension called IE Tab, download link: https://chrome.google.com/webstore/detail/ie-tab/hehijbfgiekmjfkfjpbkbammjbdenadd?hl=en

Conclusion

I hope it helps anyone who are still using the older version of Microsoft Dynamics CRM. And I now really appreciate the hard work of the Dynamics CRM product team to deliver multi-browser compatibility enhancement to Dynamics CRM.


Standalone WcfTestClient

Recently I have to work on a client to do some WCF configuration update to conform with their new IFD Deployment. The first tool that I’m trying to find to test WCF Services is WcfTestClient. However I only have the WcfTestClient on my own machine (with Visual Studio installed). While, client’s machines do not have Visual Studio. After doing some quick research, I found out that WcfTestClient can be made “portable”. So, I made my own “portable” WcfTestClient. The only requirement is to have .Net Framework installed (most of the client’s machine usually has .Net framework isntalled).

I shared the WcfTestClient on my OneDrive:

https://onedrive.live.com/redir?resid=4CF16D17C29C8F61!1580&authkey=!ADkPUmhfdAQS5Hg&ithint=file%2c.zip

Dynamics CRM 2013 SP1 SDK – New Tool: Configuration Migration

Following up my previous post on the Revamped Plugin Registration Tool, I explored the new Tools folder in the latest Dynamics CRM 2013 SP1 SDK. There is a new tool called “Configuration Migration”.

This tool will make our life easier, especially in migrating some basic data from one org to another (e.g: Dev to Test to Prod).

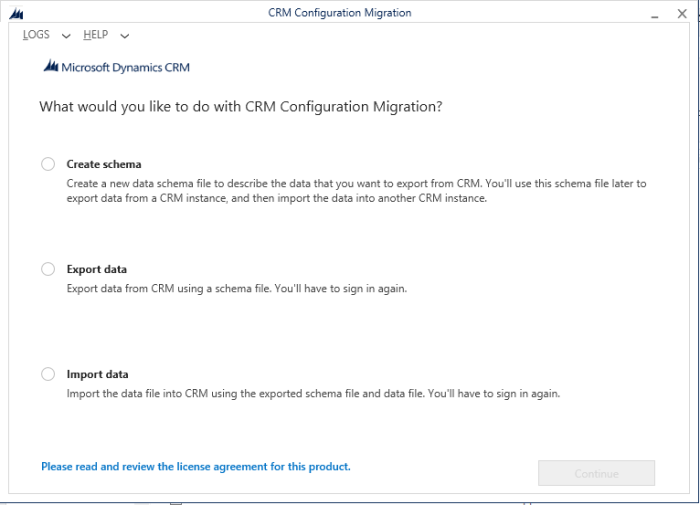
So, this is how this now tool looks like:

There are 3 options available:

  • Create Schema
  • Export Data
  • Import Data

Create Schema

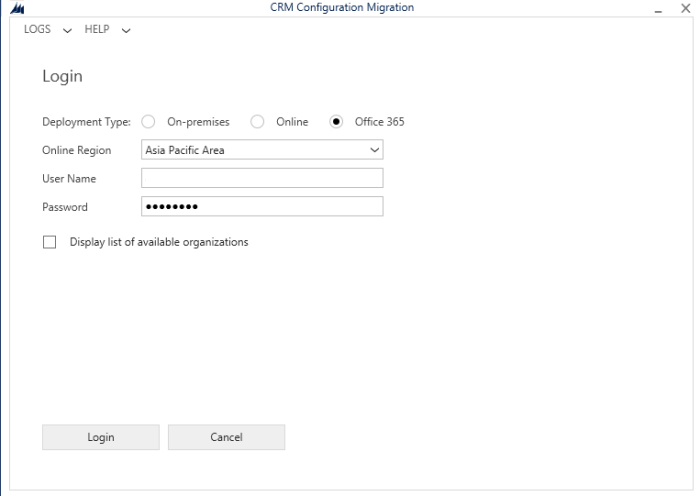
Let’s run through the first option (as this is the basic foundational usage of this tool). Again, it has the same Login layout as the Revamped Plugin Registration Tool:

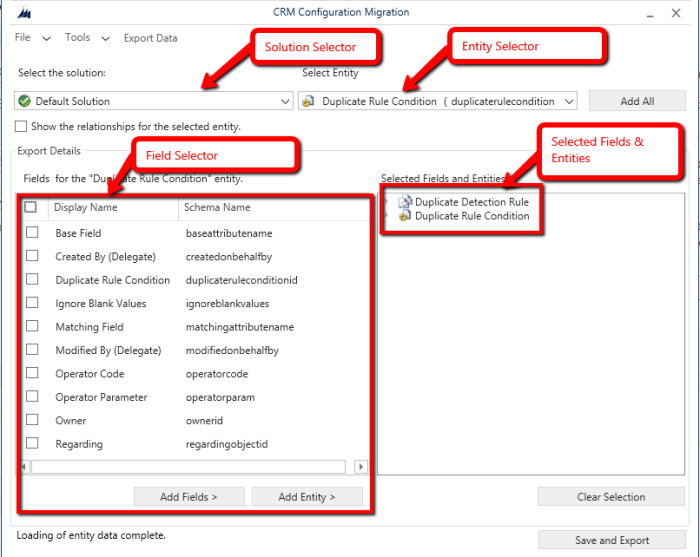
It will then open the Schema Builder window. This tool is really useful as it could picks up the configuration records that usually not picked up by CRM Solution. In my example is the Duplicate Detection Rule:

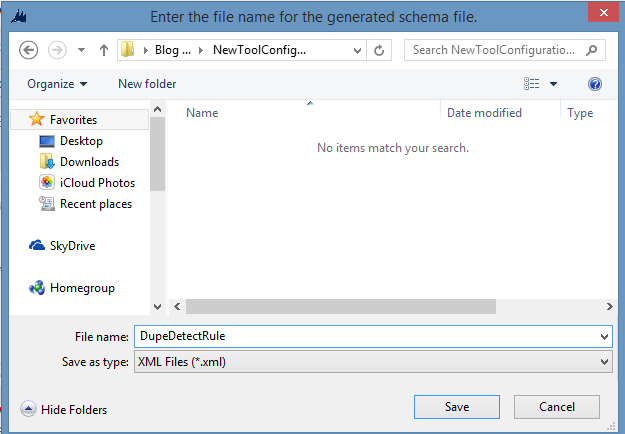
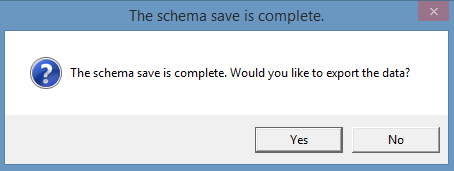
Once finished building the schema, click on Save and Export button. It will then open the window to save the schema file (XML) and prompt whether we want to Export the data. (I pressed no, to explore the second option, export data option above)

Export Data

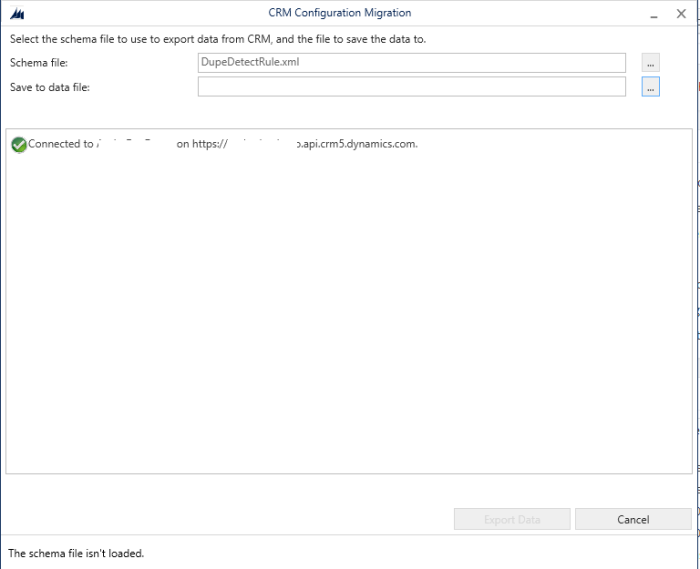
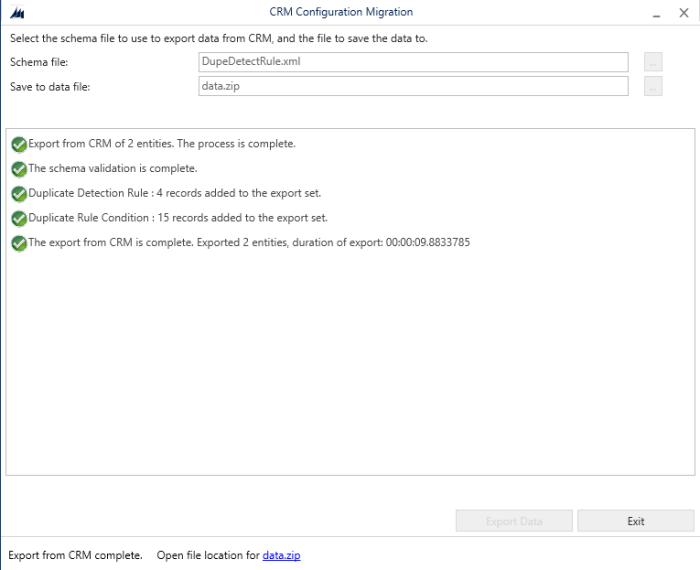
When selecting the Export Data, it will ask the previously generated Schema File and the location where the data will be saved (the data will be in Zipped format):

The successful export will display the following result:

Import Data

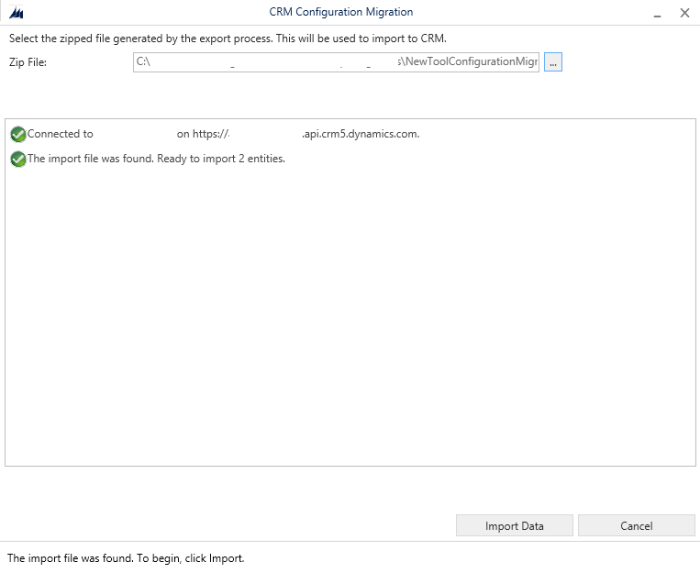
The last option is Import Data, again it will prompt the login to the destination org, establishing the connection threads and prompting the data source zip file.

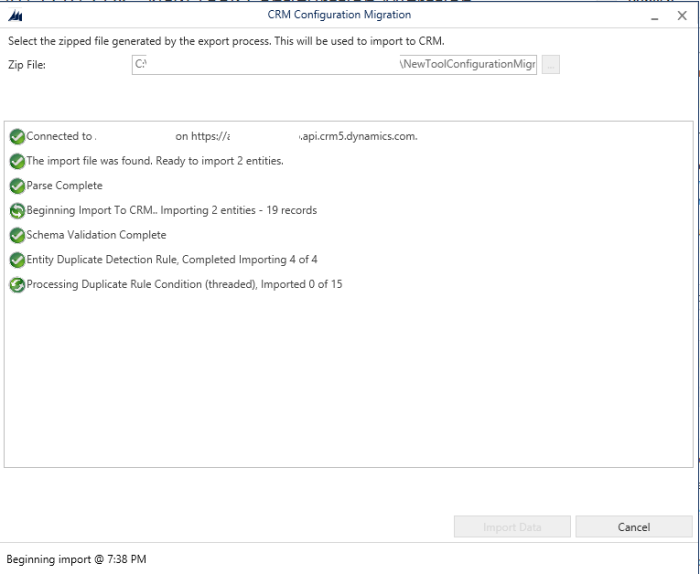
Click on Import Data to proceed…

Once it’s finished, the new record is migrated to the destination org. This is a really handy tool for system admin/customizer when deploying the configuration, records, sample data, etc from one org to another.

Edit on 23/05/2014: found the guide provided by MSDN for more thorough High-level purpose of the usage of this tool. http://msdn.microsoft.com/en-us/library/dn647421.aspx


Dynamics CRM 2013 SP1 Plugin Registration Tool Revamped!

Today I checked the Dynamics CRM forum to answer some of the questions there. One of the question that I tried to answer was regarding the plugin registration tool. The screen shot that uploaded by the question shows different UI of plugin registration tool that I usually use.

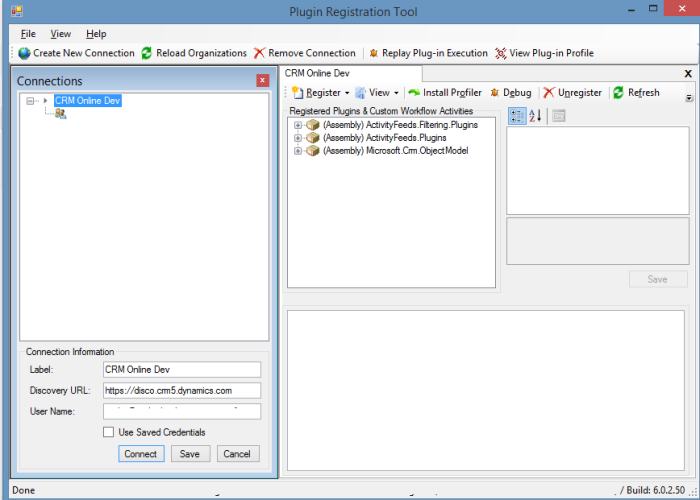
Then I check the latest SDK for Dynamics CRM 2013 SP1 (6.1): http://www.microsoft.com/en-au/download/details.aspx?id=40321. The SDK now provides the new Registration Tool under Tools > Plugin Registration (No longer in the “Bin” folder)

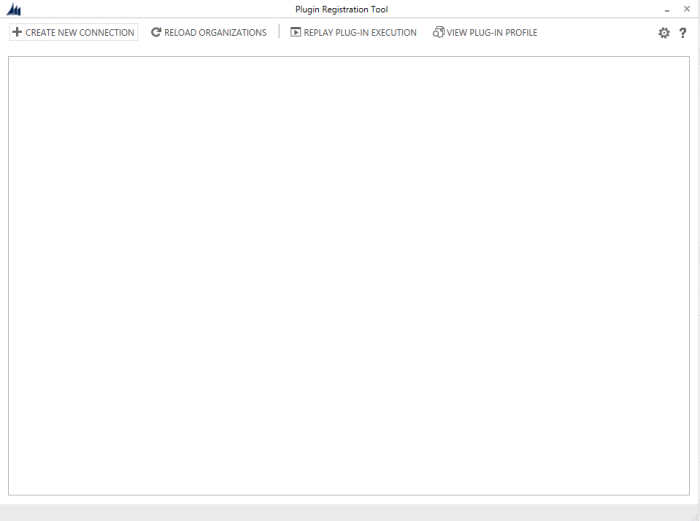
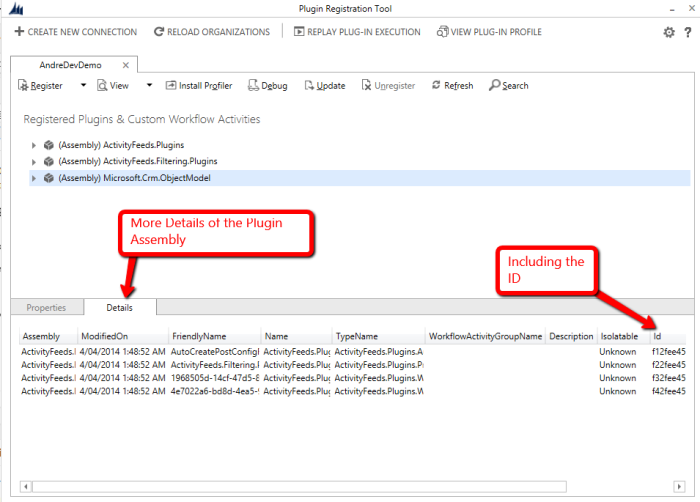
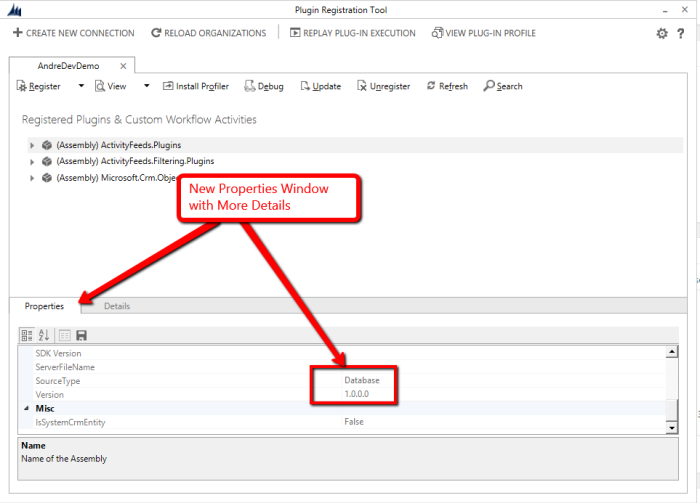
Below is the comparison of the old & new layout of the plugin registration tool:

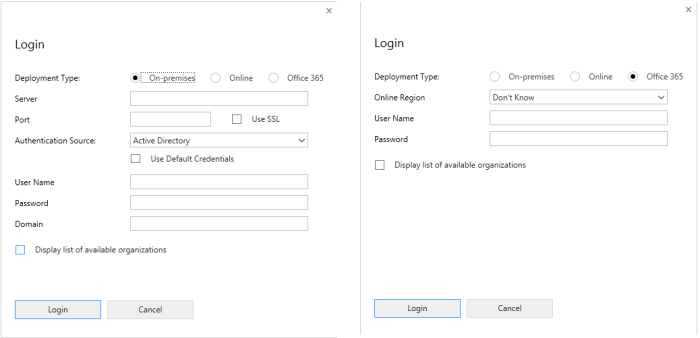
The new Tool definitely is no longer using Windows Form Application. The new tool has different authentication method than the old tool, where we don’t need to specify the discovery URL (where we usually need to go to Settings > Customization > Developer Resource):

The Online Region Selector now helps us to construct which CRM discovery server to be connected to (where crm5 is my region):

Overall functionality of the tool does not change. There are some details that added to the new Plugin Registration tool

One thing that made me curious is the usage of the “Gear” button (usually it’s setting) that cannot be clicked. Perhaps it’s a bug??


Important information about supported configurations in the next release for CRM

The CRM Product team recently released the latest updates on supported configurations in the next release for Microsoft Dynamics CRM.

It includes removal of their supports for the popular Windows and SQL Server 2008 (time to upgrade!)

And also completely removes some of the deprecated javascript functions:

  • GetServerUrl()
  • IsOutLookClient()
  • IsOutlookOnline()

Full post: http://blogs.msdn.com/b/crm/archive/2014/05/14/important-information-about-supported-configurations-in-the-next-major-release-for-crm.aspx

Update Rollup 17 For Dynamics CRM 2011 is Released

Following up my previous post on the compatibility issue of Microsoft Dynamics CRM 2011 with Windows 8.1 and Internet Explorer 11 here. Microsoft recently released Update Rollup 17 that addressed those issues.

Microsoft Dynamics CRM 2011 Update Rollup 17 is compatible with Windows 8.1 or Windows 7 and Internet Explorer 11. This includes the following supported configurations.

  • The web application running in Internet Explorer 11 on Windows 8.1 or Windows 7.
  • CRM for Outlook when you run Office 2013 on Windows 8.1.

Other than the above major fix/update, it also fixed some issues that I encountered:

  • Reports cannot be executed once the default filter form the report is removed and the update is saved. The execution fails with the following error on screen. “Reporting Error: The repot cannot be displayed”
  • Advanced Find date range with “last-x-fiscal-years” is wrong when exported to a Dynamic Worksheet

Complete list of issues addressed in this Rollup is available on the KB Article:

http://support.microsoft.com/kb/2915687

Download:

http://www.microsoft.com/en-us/download/details.aspx?id=42672


Data Migration/System Integration using SSIS (Salesforce to Dynamics CRM Example)

Recently I had a chance to do a couple of data migration & integration projects for Dynamics CRM. On these projects, the ISV product that we chose is Dynamics CRM SSIS Connector by KingswaySoft. I got a great support from my MVP role model, Daniel Cai, during the project.

In this post, I would like to explain some basic setup, features and benefits of using the SSIS connector for Dynamics CRM. SSIS is really useful in system integration and migrating the data from legacy system to a newer one. In my sample scenario I’ll be using Salesforce.com as the data source and Dynamics CRM as target source. (This sample scenario is considering the of the situation of migrating data from Salesforce to Dynamics CRM. So, I hope this post will be beneficial for anyone that migrating data or considering to move from Salesforce to Dynamics CRM).

Note: KingswaySoft provides free SSIS connector to run under BIDS/Visual Studio, therefore it is a great tools for once-off data migration projects. For continuous processes (set the SSIS package schedule for instance), we need to buy the paid license (really reasonable price for this quality of tool + support). For pricing & purchasing info: https://www.kingswaysoft.com/purchase

Part 1: Environment Setup

1 . Visual Studio 2012 with SSDT Installed / BIDS 2008

(Note: Depends on the Production environment; AFAIK, the manifest file generated for deployment will be based on the IDE that generate the SSIS package; e.g. BIDS 2008 is for SQL Server 2008, and SSDT 2012 is for SQL Server 2012)

In this example I’m going to use Visual Studio 2012 with SSDT installed. (Download: http://www.microsoft.com/en-au/download/details.aspx?id=36843)

2. Install SSIS Connector for Dynamics CRM.

Download: http://www.kingswaysoft.com/products/ssis-integration-toolkit-for-microsoft-dynamics-crm/download

Dynamics CRM Connector help Manual:

http://www.kingswaysoft.com/products/ssis-integration-toolkit-for-microsoft-dynamics-crm/help-manual

3. Intall SSIS Connector for Salesforce.

Download: https://www.kingswaysoft.com/products/ssis-integration-toolkit-for-salesforce/download

Salesforce Connector help Manual:

https://www.kingswaysoft.com/products/ssis-integration-toolkit-for-salesforce/help-manual


The installers from KingswaySoft will then install the License Managers for both products (Dynamics CRM and Salesforce)
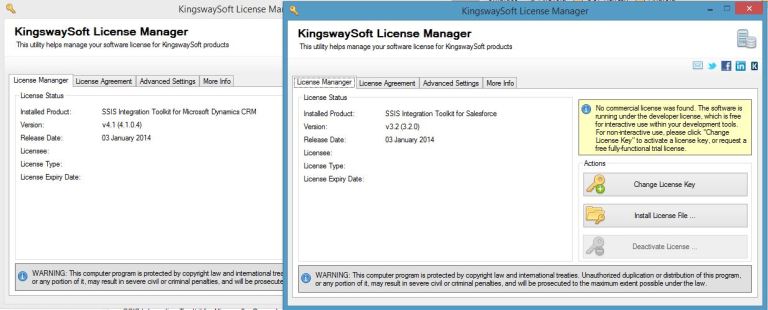
Part 2: Getting Started With “CRM” SSIS Project

For this sample, I’m using Salesforce.com developer edition. To get a free developer license: https://developer.salesforce.com/ then click on Sign-Up.

The SSDT installation for Visual Studio 2012 will install Business Intelligence Project Templates in Visual Studio. Therefore, when we create on New Project, the new Business Intelligence Projects will appear on the template list. Select Business Intellience > Integration Services > Integration Services Project:
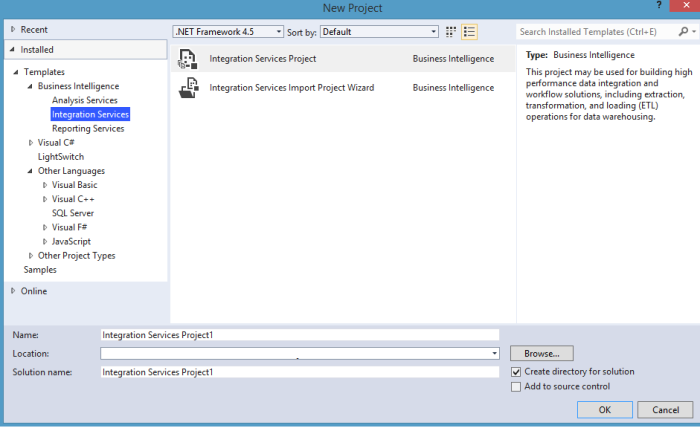
For a fresh install on BIDS 2008, the Dynamics CRM and Salesforce connector will not appear automatically, to add the Conneciton Manager and the Toolbox components please refer to the help manuals listed above (part 1). Visual Studio 2012 + SSDT installation automatically lists all available pipeline components by scanning the system.

Setup Connection Managers

First of all, we need to create connections to both Salesforce (Source) and Dynamics CRM (Target). By Right-Click the Connection Managers box > New Connection:
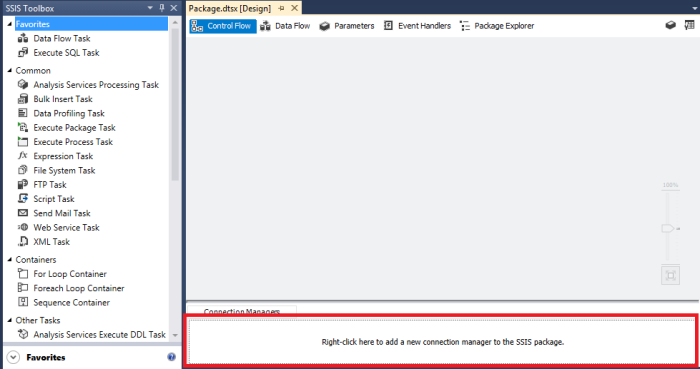
Dynamics CRM and Salesforce connection will be listed amongst the connection list:

  • Create Salesforce Connection Manager:

The connection manager will open up the connection window that consist of Username, Password and Security Token to Salesforce org. To test whether connection has been successfully configured, click on “Test Connection” button. Then click OK to create the Salesforce Connection Manager.
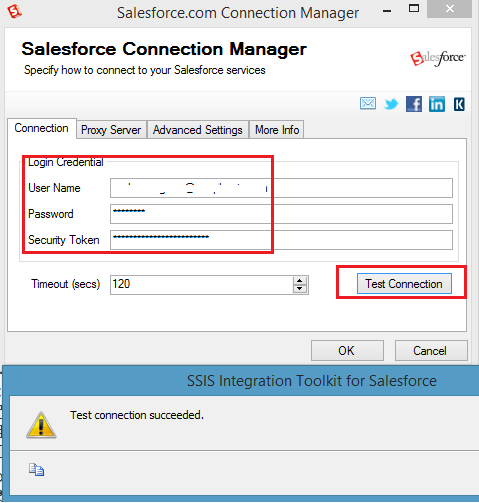
Note: Salesforce connection is highly secured and they implemented Security Token for any API connections that came from outside trusted IP ranges. To reset the security token (in case not provided initially):
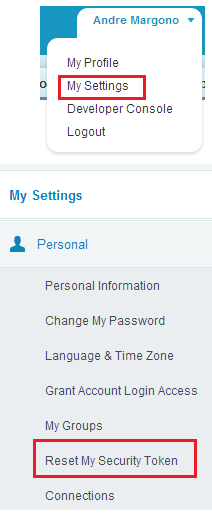
  • Create Dynamics CRM Connection Manager:

The conncetion manager will open up the connection window that consist of Authentication Type, Discovery Service URL (please note the discovery service only need the first part of the URL. Without the following “XRMServices/2011/Discovery.svc”), Service Endpoint, SDK Client Version, Username, Password and Organisation Name. To test whether connection has been successfully configured, click on “Test Connection” button. Then click OK to create the Dynamics CRM Connection Manager.
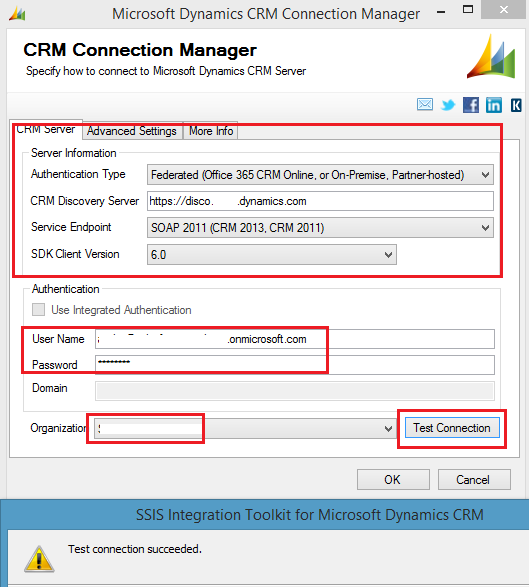
Note: (As usual) to get the Dynamics CRM web services URLs, navigate to: Settings > Customizations > Developer Resources

Build SSIS Control Flow & Data Flow

To start building the SSIS package, it starts with the Control Flow and Data Flow. For this example I’ll transfer Lead and Account object from Salesforce to be mapped to Lead and Account Entity in Dynamics CRM. To achieve that: drag 2 Data Flow Task components into the Control Flow and named it with meaningful name, example:
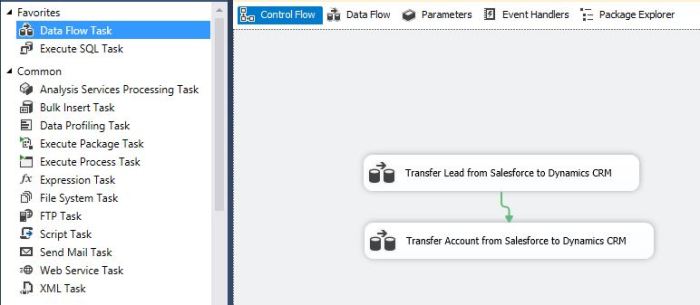
Then drill down to the underlying data flow task by double click the task in Control Flow. Drag Salesforce Source and Dynamics CRM Destination component and link them:
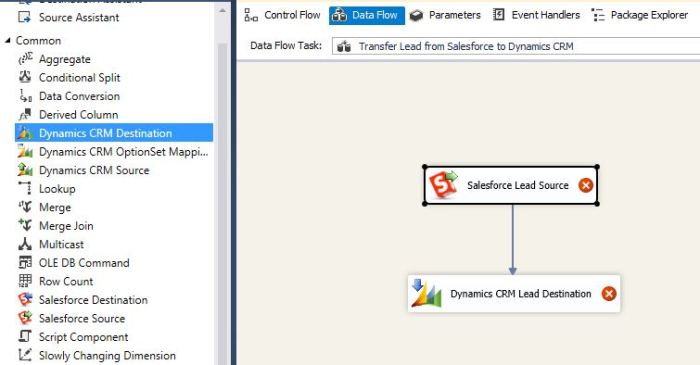
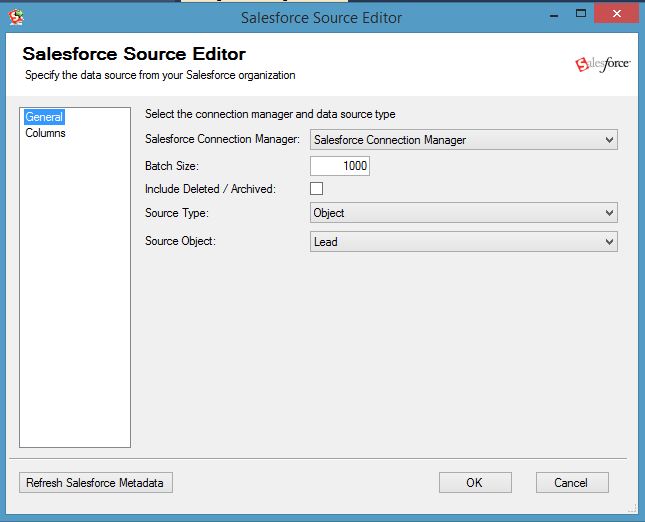
Double Click Salesforce Source to configure the Lead data source. And click on “Columns” to select the required columns as part of the data source. Then click OK:
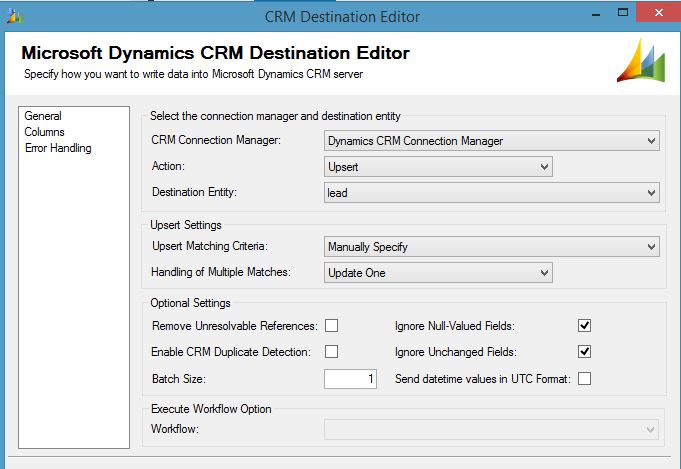
Double click Dynamics CRM Destination to configure the destination and field mappings from Salesforce:
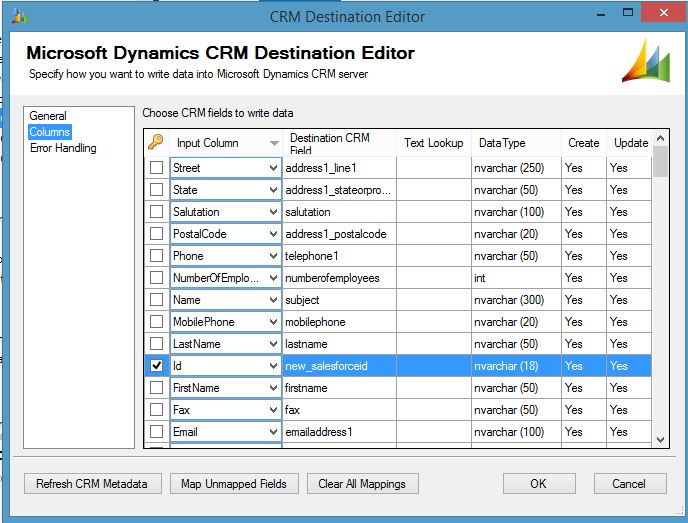
Note: I created a custom text field with 18 character to store the Salesforce id as reference (FYI: Salesforce ID is generated in either 15 or 18 length format, not GUID).

Do the same with the account and run the project:
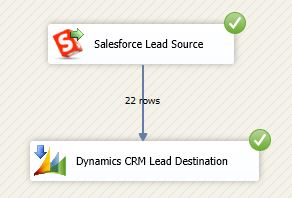
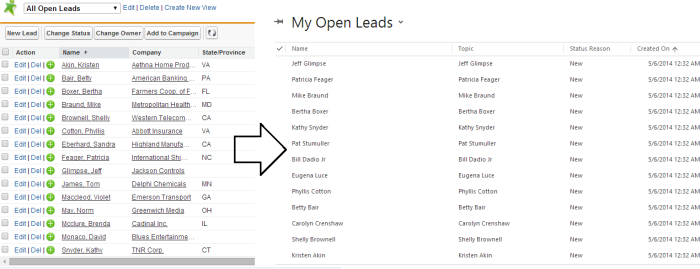
Confirm that the data are transferred from Salesforce to Dynamics CRM:
Bonus Part (Part 3): Deployment Preparation and Package Configuration

Configuration

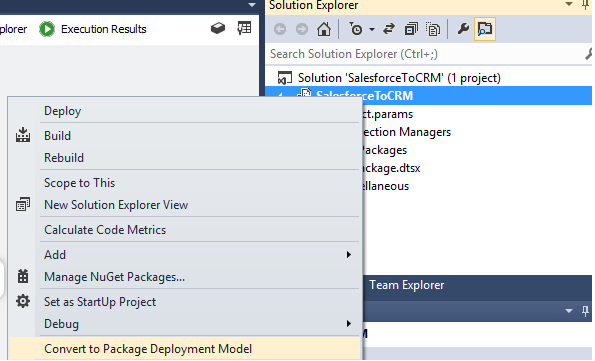
In Visual Studio 2012 + SSDT, we will not find “Package Configuration Wizard” in SSIS when we right click in Control Flow (this is the way to prepare the configurations in BIDS 2008) as the 2012 version introduced the new model for configuration and deployment called the Project deployment model. As part of that change, the old way of doing configuration (environment, xml, parent package, registry and table) is not an option. In the project deployment model, you get parameters and environments. Therefore to create the configuration in the “classic” way, right click on the solution and click on “Convert to Package Deployment Model”:
Now the package configurations option is back:

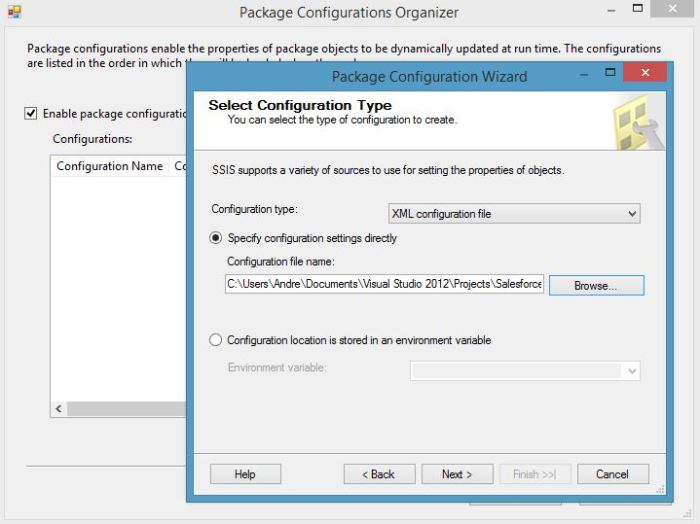
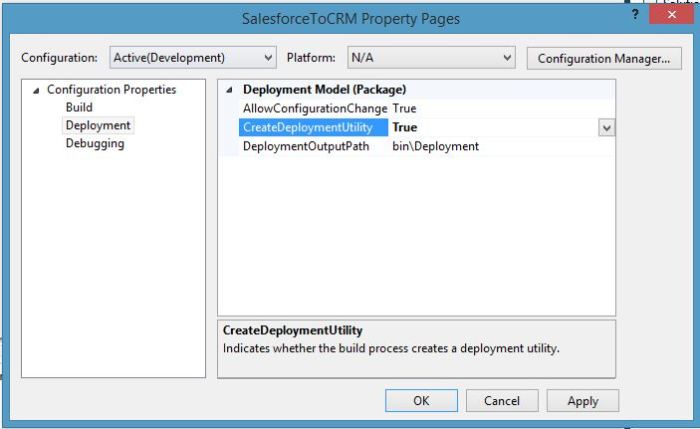
Since we have converted the deployment mode, the deployment .manifest file can be generated through the solution properties and setting the “Create Deployment Utility” to True:


And as the project being built; The deployment files are generated:

Set Filter Attributes – Update Plugin – Dynamics CRM 2013 Upgrade Gotcha

Recently I upgraded one of my virtual machine with Dynamics CRM 2011 to Dynamics CRM 2013. That instance contains my old solutions from previous learning and testing. One of the solution contains several plugins to be triggered on Update request.

With the new auto-save feature in Dynamics CRM 2013, any modification to the form will be automatically saved every 30 seconds or when the user navigated away from the from (click other records or navigate to different page). 

There was an unexpected performance issue every a couple seconds (30 seconds to be exact) when I was working with the new CRM 2013 form. After I traced the source of the problem, it was coming from the plugin that triggered every 30 seconds by the auto-save. The new auto-save functionality will trigger the plugin because I was not filtered the plugin on the required fields (attributes). This problem never happened on CRM 2011 as the update request will only be triggered through “Save” button with manual user interaction.

I think it is a best practice to filter the update plugin to only be triggered on the related attributes, to achieve that:

Method 1: through Plugin Registration Tool, on the step registered:


Method 2: through Developer Toolkit in Visual Studio, on the step registered:


This would be a lesson learn in future to do the due-diligence in selecting the correct filter attributes for the plugin.


Set Dynamics CRM Settings as Default Landing Page

The new navigation on Dynamics CRM 2013 is quite annoying for system admin/customiser/developer, as the default landing page is set to Sales (Compared to Dynamics CRM 2011, where all navigations are on the left hand side of the screen so this is not an issue).
It requires extra clicks to navigate to Settings, the place where system admin/customiser/developer care the most, by clicking Dynamics CRM Symbol > Settings, and if the mouse pointer hovered out of the navigation pane, it collapses and requires user to click the Dynamics CRM symbol again.

Getting frustrated with the non-productive time with extra clicks, I tried to look into the option and found the way to set the default landing page:
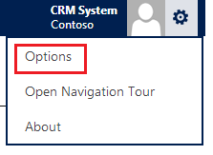
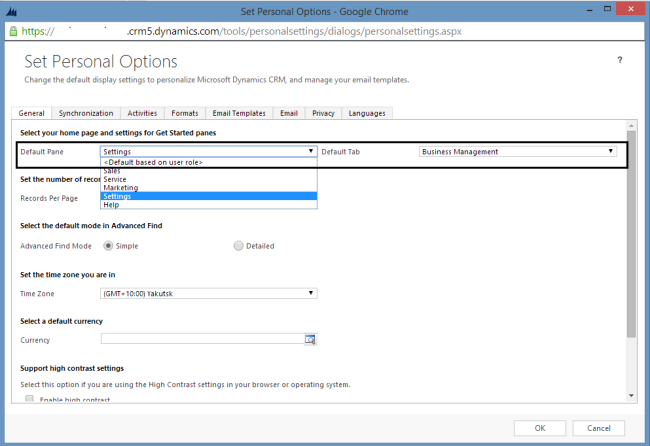
1. Click on the Gear Symbol next to user detail, click on Options (to set Personal Options).

2. Set the Default Pane and Default Tab to the required one (As Developer I prefers to go to Solutions tab, As System Admin I will go with Administration tab).


I hope this will help anyone, especially fellow developers/admins/customisers to be able to navigate in Dynamics CRM 2013 more fluently.

CRM System Admin & Customiser – Working with Dynamics CRM on iPad

Recently I stumbled across a question in Dynamics CRM Forum regarding “How to see CRM Settings on a tablet browser”

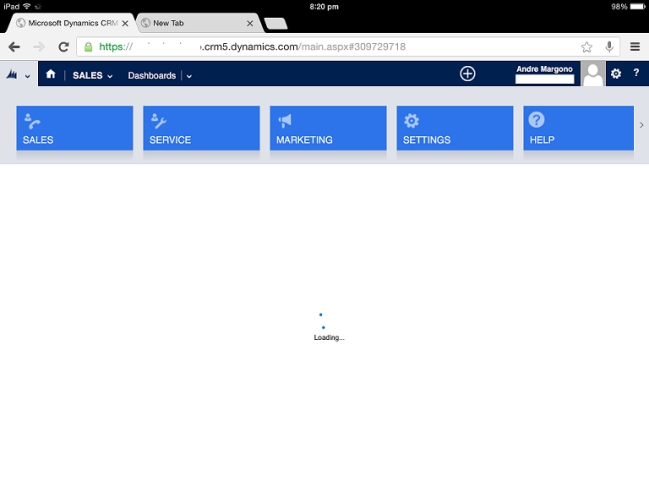
Out of my curiousity, I tried something on my iPad. The steps that I used to achieve this is using Google Chrome on iPad (never bother to check it on Safari though, as I never use that):

1. Open a new Tab, navigate to Dynamics CRM instance.

2. On Google Chrome option (the three lines at the right hand side of url bar), select “Request Desktop Site”

3. It will redirect to https://<crmserverinstance>/m/default.aspx change it to https://<crmserverinstance&gt;/main.aspx

4. Voila, the Settings button is there and works! It’s quite slow though.

Don’t Try This At Home – Adding CRMAppPool User as Dynamics CRM User

No matter how lazy we are to add new user, especially during “Proof of Concept” or Testing period.

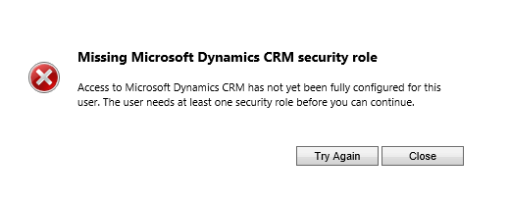
Do not add CRMAppPool User as Dynamics CRM SystemUser. This will breaks the system, moreover in multi-tenant environment – Considering the amount of time required in repairing might be bad in Multi-Tenancy environment in regards to the SLA, all of your CRM Services will break and show the following error:

Missing Dynamics CRM Security Role” – Access to Microsoft Dynamics CRM has not been fully configured for this user. The user needs at least one security role before you can continue.

Microsoft stated: “This behavior is by design. Making the account that is running the CRMAppPool into a Microsoft Dynamics CRM user is not supported.” in this KB article: http://support.microsoft.com/kb/2500917
I did that, so what I need to do?

1. Create new AD User to replace the corrupted one.

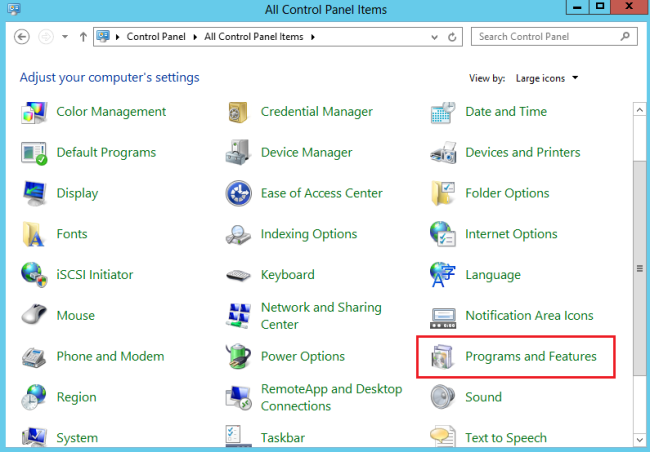
2. Open Control Panel > Programs and Features

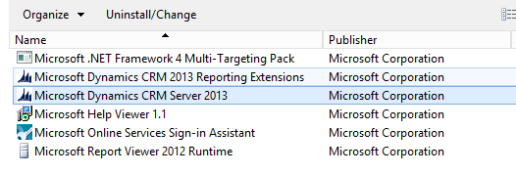
3. Open Microsoft Dynamics CRM Server 2013

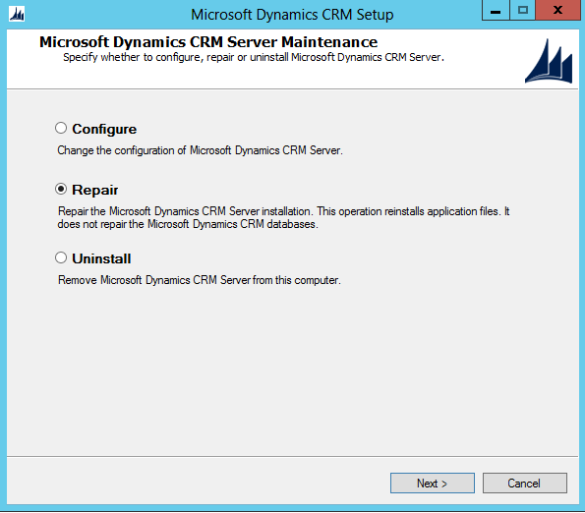
4. Select Repair

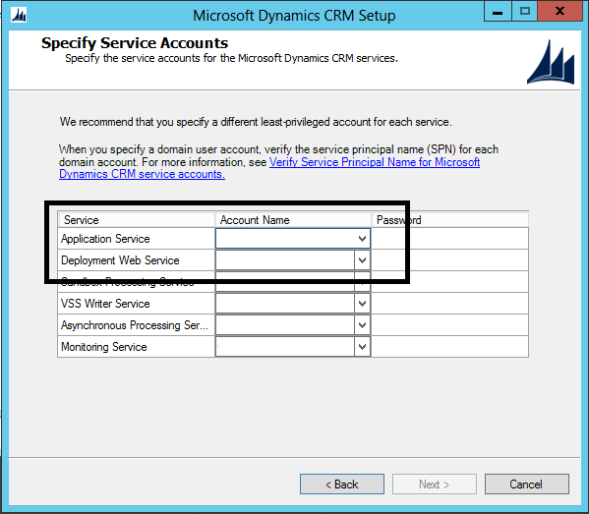
5. Update the following user configuration with the new AD user 

6. Continue the whole repair process (“Next” button spam!).

7. Test to access your CRM instances back.

Lesson Learned

Before start working with Dynamics CRM Server, read through the Implementation Guide carefully: http://www.microsoft.com/en-au/download/details.aspx?id=40322 (On CRMIGv6_Planning.docx, Section: Microsoft Dynamics CRM Services and IIS Application Pool Identity Permissions).


Microsoft Dynamics CRM Spring 2014 Release Preview Guide

Following up the excitement of last night presentation about the key new features of Dynamics CRM 2013 in Q2 2014 release in Melbourne Dynamics CRM User Group by Mark Smith (@nzCRMguy). Microsoft also released the release preview guide.

This Q2 2014 release is highlighting lots of really amazing new features:

  • Microsoft Dynamics Marketing – major enhancement for marketing: Drag and drop visual Campaign Designer, Lead lifecycle management, Marketing Personalised Homepage, Scalable Email Marketing, Power BI for Marketing, Improved Sales & Marketing Connector (This Dynamics Marketing enhancement requires an extra Office 365 Procurement).
  • Updates on Sales Automation – Insights (puts real-time company and contact information from 30,000 sources into Microsoft
    Dynamics CRM), CRM Tablet App Enhancements
  • Customer Service – USD (Unified Service Desk – not US Dollar), Enterprise Case Management (SLA & entitlements, dynamic routing, KPI, case merge, parent child case, automated case creation, Define Status Reasons, Social Care, Service Management), CRM Tablet app –  Case Management.
  • Parature – Multi-Channel Care: portal, facebook portal, mobile app, real-time chat, Knowledge Management
  • Social Listening – Listen & Analyze, Monitor & Respond, Social Insights in Microsoft Dynamics CRM
  • Sandbox Environments (2 types of sandboxes are available: Minimal Copy & Full Copy) with the abilities: reset Sandbox to Factory Settings, Sandbox snapshot. On top of the sandbox environment, Admin also has the access to the New CRM Online Admin Center.

Aside from the new front-facing features there are also enhancement on the platform capabilities that enabling organizations to build, test and configure CRM deployments of all sizes.

Tooling:

  • CRM Package Deployment Tool
  • CRM Configuration Migration Tool
  • Updated Plugin Registration Tool
  • Visual Studio Toolkit enhancements
  • More PowerShell Support
  • New Windows Client API ( Microsoft.Xrm.Tooling.xxxx )

Extensibility:

  • OAuth discovery specification to support ISV/office clients
  • GROUP AND/OR for workflows

Scale: Scaling Improvements in Async processing to handle very large workloads.

And again adding more compatible environments:

  • Windows 8.1
  • Internet Explorer 11
  • iOS7 Safari on iPad (web application)
  • iPad Air using Safari (web application)
  • Windows Server 2012 R2 (CRM server)
  • iPad Air using CRM for Tablets

Full details can be found on: http://go.microsoft.com/fwlink/p/?LinkID=395005

Once again, it is definitely an exciting journey for Dynamics CRM, Dynamics CRM is moving really fast and looking forward for the landing of this massive release.


Microsoft Dynamics CRM and Data Mining

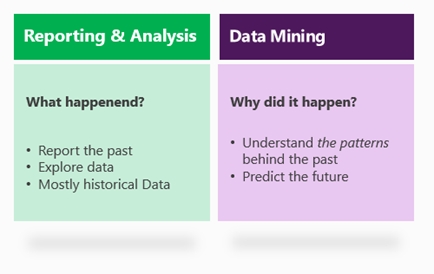
A really excellent post about Microsoft Dynamics CRM Data Mining by Mark Margolis. It’s an eye opening for me, as I usually have the understanding about the Reporting and Analysis, but with Data Mining, it enables us to predict the customer behaviour.

Mark Margolis

As you have probably already gathered I’m a big fan of Analytics and Visualisations so when my colleague Manuel Altermatt told me he was doing some work on CRM and Data Mining and wanted to do a  guest post I jumped at the chance! You can contact manuel on analyticalcrm@outlook.com.

Whilst Dynamics CRM is widely recognized for its strong operational capabilities, the outstanding analytical capabilities which arise in conjunction with SQL Server are sometimes overlooked. We can think about business intelligence in two categories:
Reporting and analytics, which are methodologies and tools that focus on “what happened”, thus working on data exploration, historical information, reports, dashboards, KPI’s, etc.
Data Mining, which are methodologies and tools that focus on “why did it happen”, thus working on data understanding, patterns, correlation, past and future data, and data prediction.

This blog post shows how Dynamics CRM can be combined with SQL Server…

View original post 1,777 more words

Awarded as Dynamics CRM MVP – The best April Fool Day Pranks ever!

First of all, it is such an honor to receive the MVP award from Microsoft this year. It’s all by grace, as there are many people who are more experienced than me in Dynamics CRM.

Yesterday morning when I woke up, I received this big email from Microsoft:

I still could not believe it, as the previous day was April Fool Day where some of my friends teased and set up some pranks on me. Including Google, where they put Pokemon Challenge on Google maps.

I still could not believe it until I click the links in the email, enter the MVP detail and bam! It’s real! I didn’t expect it, even though there was someone from Microsoft asked some contact information a couple weeks before.

So, within this post I would really express my gratitude to God, as it is completely a MIRACLE for me, Microsoft, for this amazing award, Mark Smith (@nzCRMguy) and CP (Microsoft) for allowing me to participate as Melbourne Dynamics CRM User Group Committee, Brett Yorgey, Brent Howard, Felix Hariyadi and JayThom team for introducing me to Dynamics CRM, Sarah Ashton and CRM Team in Oakton who supports me until this day, and of course, my beloved wife that supports me all the time 🙂

I hope my future experience and sharing could continue to contribute to the Dynamics CRM users.

My new MVP profile: https://mvp.microsoft.com/en-us/mvp/Andre%20Margono-5000785

Microsoft Dynamics Demo Builder

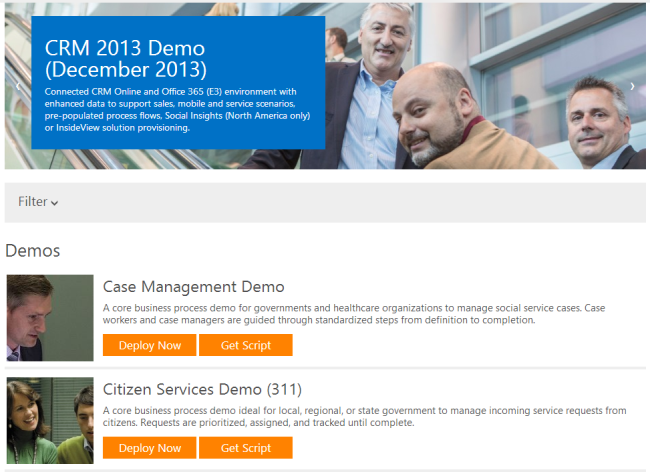
Today I found this Dynamics Demo website that will help us to quickly create demo org to present to customers. Some of the demo also contains great template such as: Grants Management, Case Management, Financial Service, CRM + SharePoint.

https://www.microsoftdynamicsdemos.com/

Dynamics CRM Compatibility with Windows 8.1 & IE 11

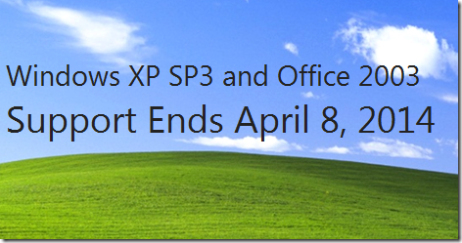
Windows XP support is going to be over on 8th of April 2014. To learn more about upgrade options for Windows XP: http://www.microsoft.com/windows/en-au/xp/upgrade-options.aspx


Everything seems good and cool. Windows 8.1 is lovely, Windows button is there, the UI is sleek and fluid, lots of Apps available in the store.
Until we come to our lovely Dynamics CRM 2011, IE 11 makes it not working properly anymore!

Why??!! 
This KB article mentioned about the Microsoft Dynamics CRM support for IE 11:
http://support.microsoft.com/kb/2935509

There are some options available:

1. Upgrade Your Microsoft Dynamics CRM to 2013 (Update Rollup 2 solves this compatibility)

KB Article: http://support.microsoft.com/kb/2919956
Download Link: http://microsoft.com/en-us/download/details.aspx?id=42272
Some good consideration when implementing UR by Donna Edwards: http://edwardsdna.com/2014/03/24/update-rollups-should-i-or-should-i-not-that-is-the-question/

2. Temporarily use Google Chrome and Mozilla Firefox until you are ready to Upgrade to Microsoft Dynamics CRM 2013 or UR on Dynamics CRM 2011 that supports IE 11.

Currently, Microsoft plans to add Internet Explorer 11 in compatibility mode as a supported web browser in the third quarter of calendar year 2014 for Microsoft Dynamics CRM 2011.

Looking forward to see more organisations to upgrade to Microsoft Dynamics CRM 2013 and taste the best of the upgrade!


Dynamics CRM 2011 UR 16 Is Available Now

Dynamics CRM 2011 UR 16 is out now. Find it: http://support.microsoft.com/kb/2872369/en-gb

Finally, it fix:

  • Can’t renew\copy a Contract when Contract Line items dates are greater than the Contract.

Dynamics CRM 2013 Certification is Available on Prometric


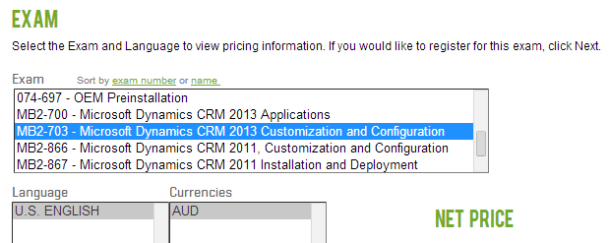
Today I found the new certifications for CRM 2013 on Prometric website when I was checking my previous exam result.


Looking forward to do the MB2-703 – Microsoft Dynamics CRM 2013 Customization and Configuration. The exam currently only available in English.

Dynamics CRM 2013 – New Features Limitations

Dynamics CRM 2013 new features: Business Process, Business Rule and Synchronous Workflow are a major leap from CRM 2011. These nifty features added a lot of benefits to the selection customisation tool. For example, by using Business Rule, we could eliminate some javascript form scripting that might require more time to test. And Synchronous Workflow might eliminate plug-in development that sometimes quite tricky to test, especially on Online deployment.

In spite of the benefits that we could utilise from these new features, there are some limitations that we might need to aware of, especially in designing the best solution in terms of maintainability, performance and the time effort that need to be spent.

Business Process
In designing business process there are maximum number of processes, stages, and steps:

  • The maximum number of activated business process flows per entity is 10.
  • The maximum number of stages in each process is 30.
  • The maximum number of steps in each stage is 30.
  • The maximum number of entities that can participate in the process flow is 5.

Synchronous Workflow
With Synchronous Workflow, user could see the results by the time the record is saved (in CRM 2013 form, the changes that made are saved automatically every more or less 30 seconds interval or by clicking the TINY save button at the bottom right of the form), compared to javascript, where user could see the changes straight away.

Planning synchronous workflow might be similar to planning synchronous plugin, try as much as possible eliminate the long-waiting process to be registered as synchronous one for better user experience.

Business Rule
This is one of the killer features of the new Dynamics CRM 2013, but there are some limitations. And for some occasion, it will determine our conclusion whether we should go with javascript/plugin/workflow/business rule.

With current release, as far as my trial-and-error experiment with business process, we could only have one condition and one action. So it is like a single if statement:


If [this condition]
Then do [this action]

Meanwhile, if-else or switch-case scenario is not available

If [condition is A]
Do [action A]
Else if [condition is B]
Do [action B]
Else if [condition C]
Do [action C]
Else
Do [default action]

To achieve this, we need separate business rules and might want to check whether one rule is unique to the other rules, which is quite messy for a solution.

If [condition is A] and [not condition B] and [not condition C]
Do [action A]
And so on…

Business Rules are Entity-Bound
The fields that can be used to build the business rule are only available from the entity that the business rule is attached to. So there are limitations when we need to access fields/condition from related entities (child/parent entity). To achieve this, we should choose either workflow/plugin/javascript path.

So far these are my findings on the limitation of the new features in Dynamics CRM 2013. In future post, I might add any additional limitations Dynamics CRM 2013 or Microsoft might release updates on these limitations to make Dynamics CRM 2013 as the best platform for xRM implementation.

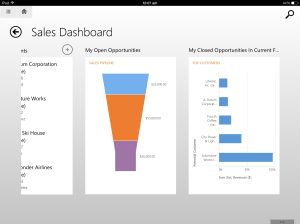
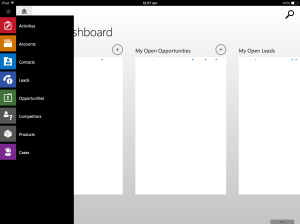
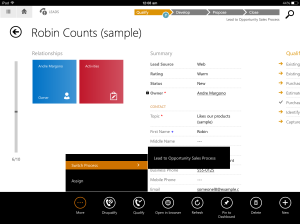
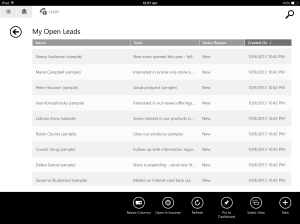
First Hands-on Dynamics CRM 2013 Mobile Client App (MoCA)

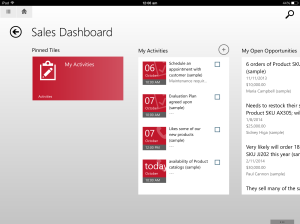
Last night I had a chance to download the Dynamics CRM 2013 mobile client app (MoCA) for iPad (3rd gen) from App Store (I wish I can get a surface to play with).

Below are the screen shots of this great mobile app that people will love:

Some features that might be lacking from this release are the phone call button on contact record does not have any selection on what kind of phone call application that can be used (Skype or Lync). From my view, Lync will be more beneficial for corporate/business perspective. And the Email button as well, it does not automatically assign my email address that I used for login into MoCA, instead it is using the default settings email. It makes the process to track the email harder when it is used in conjunction with Outlook client and Web-based application.

Service functionality seems not 100% working properly on my instance, as I could not change the status of certain service record.

Hopefully Microsoft roll-up these update soon.

Dynamics CRM 2013 Download Links. Finally!

Finally after long waiting for the release of the Dynamics CRM 2013

Exciting release of Dynamics CRM 2013 download links:

Microsoft Dynamics CRM 2013 Language Packs:
http://www.microsoft.com/en-us/download/details.aspx?id=40340

Microsoft Dynamics CRM Server 2013:
http://www.microsoft.com/en-us/download/details.aspx?id=40341

Microsoft Dynamics CRM 2013 Email Router:
http://www.microsoft.com/en-us/download/details.aspx?id=40342

Microsoft Dynamics CRM 2013 Report Authoring Extension (with SQL Server Data Tools support):
http://www.microsoft.com/en-us/download/details.aspx?id=40343

Microsoft Dynamics CRM 2013 for Microsoft Office Outlook (Outlook Client):
http://www.microsoft.com/en-us/download/details.aspx?id=40344

Microsoft Dynamics CRM 2013 List Component for Microsoft SharePoint Server 2010 and Microsoft SharePoint Server 2013 (for multiple browsers):
http://www.microsoft.com/en-us/download/details.aspx?id=40345

Microsoft Dynamics CRM 2013 Software Development Kit (SDK):
http://www.microsoft.com/en-us/download/details.aspx?id=40321

Connectivity and Firewall Port Requirements for Microsoft Dynamics CRM 2013
http://www.microsoft.com/en-us/download/details.aspx?id=40324

Microsoft Dynamics CRM 2013 performance counters
http://www.microsoft.com/en-us/download/details.aspx?id=40323

Using multi-tenancy in Microsoft Dynamics CRM 2013 to address challenges in enterprise business environments
http://www.microsoft.com/en-us/download/details.aspx?id=36056

Microsoft Dynamics CRM 2013 Custom Code Validation Tool
http://www.microsoft.com/en-us/download/details.aspx?id=30151

Not to forget, the implementation Guide:
http://www.microsoft.com/en-us/download/details.aspx?id=40322

And also Update Rollup 15 for CRM 2011
http://www.microsoft.com/en-us/download/details.aspx?id=40346
for KB article that related to this UR 15: http://support.microsoft.com/kb/2843571

It’s a really exciting releases from Microsoft!

Styling Emails with CSS – ClickDimensions blog

This is a re-post from:

http://blog.clickdimensions.com/2013/09/styling-emails-with-css.html

on how to make styling for email templates in Dynamics CRM. This is really helpful approach. And remember, table-layout! Email is not website.

Dynamics CRM 2013 [Beta] Exciting Part! Process Form & Business Rules Everywhere!

I’m lucky enough to get a hands-on with the new Dynamics CRM 2013 Beta from my current company as part of partner readiness.

The features that I really love from this new update are: Process Form & Business Rules!

What is Process Form? This update was released on CRM Online version in Dec 2012, around the same time as the release of UR 12 (Exciting multi-browsers support). This feature is helping sales process to keep track with each stage of a form. And now it’s available everywhere on every entity (as far as I can see in this beta release)!

Next is Business Rule. What is it? This is an amazing feature to implement business logic on certain entity. We could build our validation rule on the form, field update, hide/show part within form, make field editable based on certain values and many more awesome functionality and it is bound to solution! From developer point of view, this will reduce the time to do form scripting (reduce testing time when there is bug/wrong logic in the js)

Would this replace plug-in or workflow functionality? To certain extent it may.

I’ll keep updating this post with screenshots and more detailed features.

IE Developer Tool – Minified JavaScript – Make it Neat!

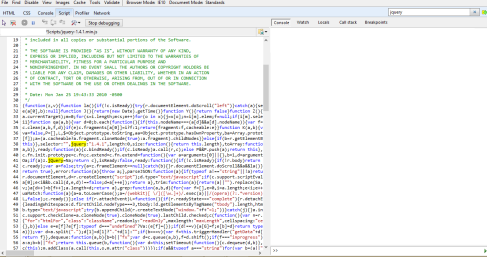
Recently I’m working on a web application and need to debug a 3rd party solution. The javascript file is minified to make it efficient in loading speed as the smaller size is less data that need to be transferred. 

When I’m debugging this javascript file, I debugged using IE developer tool (for whatever reason, this is my favorite debugging tool, even I still using firebug and Chrome’s dev tool). However, how could I possibly read this whole gibberish javascript file?? (for example I used jquery.min.js)

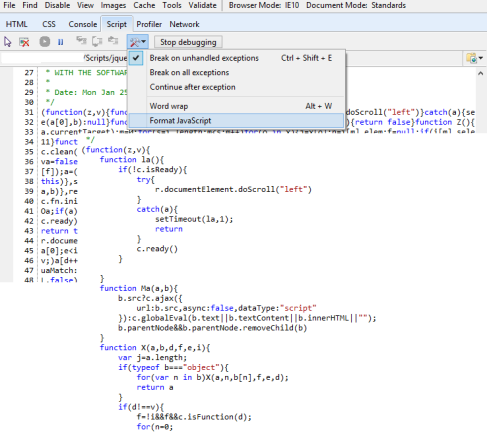
It’s really frustrating isn’t it? As curious as anytime, I clicked everywhere on the toolbar to make the script neater. And I found this amazing Format Javascript option, and this is the result:


Why this option not turned on by default? I don’t know, but now I can read the javascript file, at least to debug it.


New Journey (Part 3)

Today I finally finished all of the configurations on my DNS and AD server, I was trying to add my other servers (SQL, CRM and SharePoint) to my new domain, unfortunately, I found a small issue:

An Active Directory Domain Controller (AD DC) for the domain “andre.local” could not be contacted.

Ensure that the domain name is typed correctly.

If the name is correct, click Details for troubleshooting information.

Note: This information is intended for a network administrator.  If you are not your network’s administrator, notify the administrator that you received this information, which has been recorded in the file C:Windowsdebugdcdiag.txt.

The following error occurred when DNS was queried for the service location (SRV) resource record used to locate an Active Directory Domain Controller (AD DC) for domain “andre.local”:

The error was: “DNS name does not exist.”
(error code 0x0000232B RCODE_NAME_ERROR)

The query was for the SRV record for _ldap._tcp.dc._msdcs.andre.local

Common causes of this error include the following:

– The DNS SRV records required to locate a AD DC for the domain are not registered in DNS. These records are registered with a DNS server automatically when a AD DC is added to a domain. They are updated by the AD DC at set intervals. This computer is configured to use DNS servers with the following IP addresses:

192.168.137.1

– One or more of the following zones do not include delegation to its child zone:

andre.local
local
. (the root zone)

This issue is quite new for me, after taking some time in troubleshooting, I decided to fix it up by set the server DNS manually:

Open Network and Sharing Center, then click Changes Adapter Settings and open the properties of Local Area Connection, and then open properties of Internet Protocol Version 4. Click on Advanced button in the bottom and select DNS tab.

Add the IP address of my DNS server and press OK.

Now go back to update the domain of the server, it will prompt username and password that has been registered in AD server. Fill it, and voila, “Welcome to andre.local domain.” It will ask to restart the computer, restart and congratulations now it connected to AD!

New Journey (Part 1)

Recently I decided to learn more about IT Infrastructure, especially on Dynamics CRM deployment and installation. And also installation of SharePoint Server, currently planning on installing 2010 and 2013 on different VMs. 

First step on my journey in installation of these servers is:

Prepare Active Directory for all servers to authenticate. Give my credit to howtogeek.com by providing such great step-by-step tutorial on: http://www.howtogeek.com/99323/installing-active-directory-on-server-2008-r2/

This is the content of the tutorial:

Active Directory is essential to any Microsoft network built on the client-server network model–it allows you to have a central sever called a Domain Controller (DC) that does authentication for your entire network. Instead of people logging on to the local machines they authenticate against your DC. Lets take a look at how to install Microsoft’s Active Directory.

Installation

Open Server Manager and click on roles, this will bring up the Roles Summary on the right hand side where you can click on the Add Roles link.

This will bring up the Add Roles Wizard where you can click on next to see a list of available Roles. Select Active Directory Domain Services from the list, you will be told that you need to add some features, click on the Add Required Features button and click next to move on.

A brief introduction to Active Directory will be displayed as well as a few links to additional resources, you can just click next to skip past here and click install to start installing the binaries for Active Directory.

When the installation is finished you will be shown a success message, just click close.

Configuration

Open up Server Manager, expand Roles and click on Active Directory Domain Services. On the right hand side click on the Run the Active Directory Domain Services Installation Wizard (dcpromo.exe) link.

This will kick off another wizard, this time to configure the settings for you domain, click next to continue.

The message that is shown now relates to older clients that do not support the new cryptographic algorithms supported by Server 2008 R2, these are used by default in Server 2008 R2, click next to move on.

Choose to create a new domain in a new forest.

Now you can name your domain, we will be using a .local domain the reason why will be explained in an upcoming article.

Since this is the first DC in our domain we can change our forest functional level to Server 2008 R2.

We want to include DNS in our installation as this will allow us to have an AD Integrated DNS Zone, when you click next you will be prompted with a message just click yes to continue.

You will need to choose a place to store log files, it is a best practice to store the database and SYSVOL folder on one drive and the log files on a separate drive, but since this is in a lab environment I will just leave them all on the same drive.

Choose a STRONG Active Directory Restore Mode Password and click next twice to kick off the configuration.

You will be able to see what components are being installed by looking in the following box.

When its done you will be notified and required to reboot your PC.

That’s all  there is to it guys, now you have a working installation of Active Directory.

New Journey (Part 2)

Installing DNS, yes this is the step that required when installing AD DS.

I found the article from Microsoft Tech Flash on how to install and configure DNS on Windows Server 2008 and 2008 R2: http://technet.microsoft.com/en-au/library/cc725925.aspx

The content of that page is:

Installing a Domain Name System (DNS) server involves adding the DNS server role to an existing Windows Server 2008 server. You can also install the DNS server role when you install the Active Directory Domain Services (AD DS) role. This is the preferred method for installing the DNS Server role if you want to integrate your DNS domain namespace with the AD DS domain namespace.

Membership in the Administrators group, or equivalent, is the minimum required to complete this procedure. Review details about using the appropriate accounts and group memberships at http://go.microsoft.com/fwlink/?LinkId=83477.

To install a DNS server

  1. Open Server Manager. To open Server Manager, click Start, and then click Server Manager.
  2. In the results pane, under Roles Summary, click Add roles.
  3. In the Add Roles Wizard, if the Before You Begin page appears, click Next.
  4. In the Roles list, click DNS Server, and then click Next.
  5. Read the information on the DNS Server page, and then click Next.
  6. On the Confirm Installation Options page, verify that the DNS Server role will be installed, and then click Install.

Additional considerations

  • We recommend that you configure the computer to use a static IP address. If the DNS server is configured to use DHCP-assigned dynamic addresses, when the DHCP server assigns a new IP address to the DNS server, the DNS clients that are configured to use that DNS server’s previous IP address will not be able to resolve the previous IP address and locate the DNS server.
  • After you install a DNS server, you can decide how to administer it and its zones. Although you can use a text editor to make changes to server boot and zone files, this method is not recommended. DNS Manager and the DNS command-line tool, dnscmd, simplify maintenance of these files, and they should be used whenever possible. After you begin using DNS Manager or command-line management of these files, editing them manually is not recommended.
  • You can administer DNS zones that are integrated with AD DS only with DNS Manager or the dnscmdcommand-line tool. You cannot administer these zones with a text editor.
  • If you uninstall a DNS server that hosts AD DS-integrated zones, these zones are saved or deleted according to their storage type. For all storage types, the zone data is stored on other domain controllers or DNS servers. The zone data is not deleted unless the DNS server that you uninstall is the last DNS server hosting that zone.
  • If you uninstall a DNS server that hosts standard DNS zones, the zone files remain in the %systemroot%system32Dns directory, but they are not reloaded if the DNS server is reinstalled. If you create a new zone with the same name as an old zone, the old zone file is replaced with the new zone file.
  • When they write DNS server boot and zone data to text files, DNS servers use the Berkeley Internet Name Domain (BIND) file format that is recognized by legacy BIND 4 servers, not the more recent BIND 8 format.

Additional references

Solution file (.sln) lost CRM Developer Toolkit Instance

I’ve encountered this issue several times (especially when we are check in to TFS), that the solution file is not merged properly, and for some reason the developer toolkit bind is removed.

 
To fix this, edit .sln file using notepad/any text editor, then add:
 
GlobalSection(CRMSolutionProperties) = preSolution
  SolutionIsBoundToCRM = True
EndGlobalSection​
 
In Global, after:
 
GlobalSection(TeamFoundationVersionControl) = preSolution


Usefulness of WCF Tracing

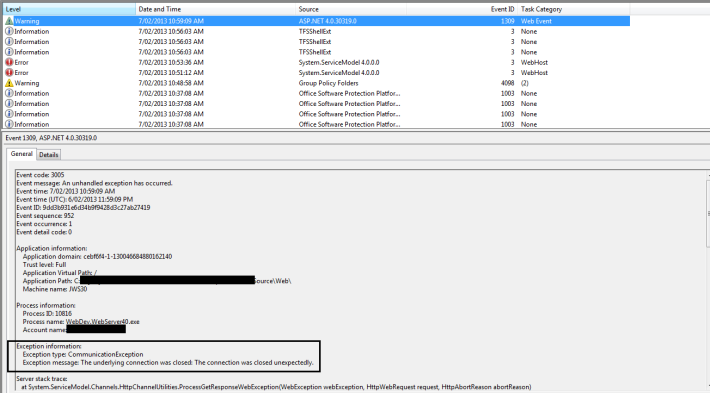
Today I got some “unhelpful” exception while upgrading one of the project from CRM 4 to 2011. And the structure of the project is changed from using direct communication from website to CRM, now it utilize WCF in between.

I’ve been doing WCF for about 2 year, but now I just found out that WCF tracing can be this useful. So, this is what happened:
No clear explanation right?

Then I decided to trace and add this in web.config of WCF:
<system.diagnostics><sources>  <source name="System.ServiceModel" switchValue="Information, ActivityTracing" propagateActivity="true"><listeners>  <add name="traceListener" type="System.Diagnostics.XmlWriterTraceListener" initializeData= "c:\traces.svclog" /></listeners>  </source></sources>  </system.diagnostics>

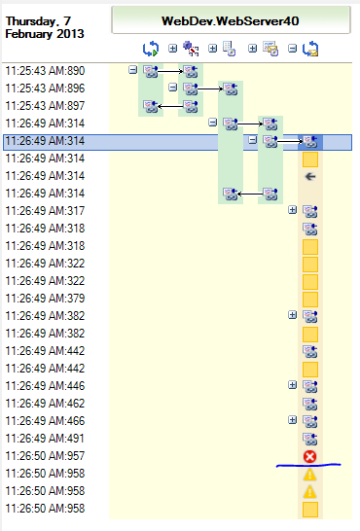
Do the problematic process again, and it generates:
I opened it, skim through the log and found this:

Double click that one, something goes wrong..

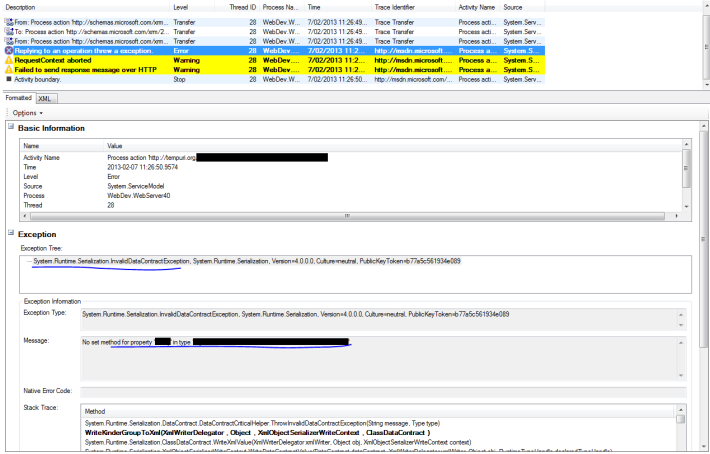
Select that error:

Gotcha! Now I have better clue on what I should fix..

MS CRM 2011 – Hiding a Group of Ribbon on Specific State

Today I come up with another task to only show the button on a group only when the record has already been saved.
After some times reading at the CRM 2011 SDK documentation and some time searching for clue, I found a solution.


The above pictures are the desired result. The button should be shown after the record has been saved.

So the changes to the Ribbon XML can be like this:

<RibbonDiffXml><CustomActions>  <CustomAction Id="Mscrm.ISV.campaignresponse.CustomGroup.MaxSize.CustomAction" Location="Mscrm.Form.campaignresponse.MainTab.Scaling._children" Sequence="150"><CommandUIDefinition>  <MaxSize Id="Mscrm.ISV.campaignresponse.CustomGroup.MaxSize" GroupId="Mscrm.ISV.campaignresponse.CustomGroup.Interaction" Sequence="21" Size="LargeLarge" /></CommandUIDefinition>  </CustomAction>  <CustomAction Id="Mscrm.ISV.campaignresponse.CustomGroup.CustomAction" Location="Mscrm.Form.campaignresponse.MainTab.Groups._children" Sequence="115"><CommandUIDefinition>  <Group Id="Mscrm.ISV.campaignresponse.CustomGroup.Interaction" Command="Mscrm.Enabled" Title="Interaction" Sequence="85" Template="Mscrm.Templates.3.3" ><Controls Id="Mscrm.ISV.campaignresponse.CustomGroup.Controls">  <Button Id="Mscrm.ISV.campaignresponse.Form.Interaction.Button.AddGuest"Command="Mscrm.ISV.campaignresponse.Form.Interaction.Command.AddGuest"ToolTipTitle="Tip"ToolTipDescription="Add Guest"LabelText="Add Guest"Alt="Add Guest"Image16by16="/_imgs/ribbon/AssignRoles_16.png"Image32by32="/_imgs/ribbon/AssignRoles_32.png"TemplateAlias="o1" /></Controls>  </Group></CommandUIDefinition>  </CustomAction></CustomActions><Templates>  <RibbonTemplates Id="Mscrm.Templates"></RibbonTemplates></Templates>  <CommandDefinitions>  <CommandDefinition Id="Mscrm.ISV.campaignresponse.Form.Interaction.Command.AddGuest"><EnableRules></EnableRules><DisplayRules>  <DisplayRule Id="Mscrm.ISV.campaignresponse.CustomGroup.Interaction" /></DisplayRules><Actions>  <Url Address="$webresource:pages/addGuests" PassParams="true"/></Actions>  </CommandDefinition>  </CommandDefinitions><RuleDefinitions>  <TabDisplayRules />  <DisplayRules><DisplayRule Id="Mscrm.ISV.campaignresponse.CustomGroup.Interaction">  <FormStateRule State="Create" InvertResult="true" /> <!-- THIS IS THE TRICK --></DisplayRule>  </DisplayRules>  <EnableRules /></RuleDefinitions><LocLabels /></RibbonDiffXml>

Add Button to Ribbon on MSCRM 2011

Today I got a task to put a button on Ribbon Bar in Microsoft Dynamics CRM 2011.
I’m new to 2011, even I only learned CRM 4 about 5 months ago.

I can’t find good references on the SDK, luckily I found Gareth’s Tucker Blog that discuss into detail how to create a button.

Hopefully it helps us, developers 🙂

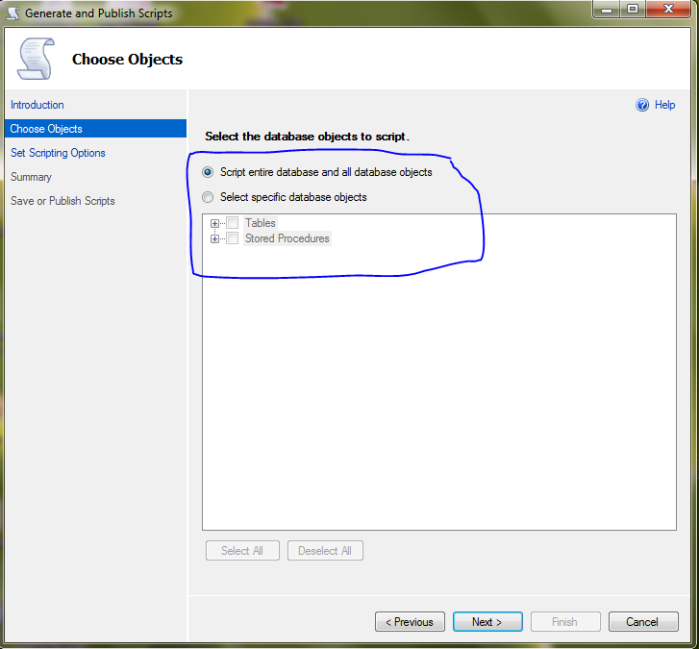
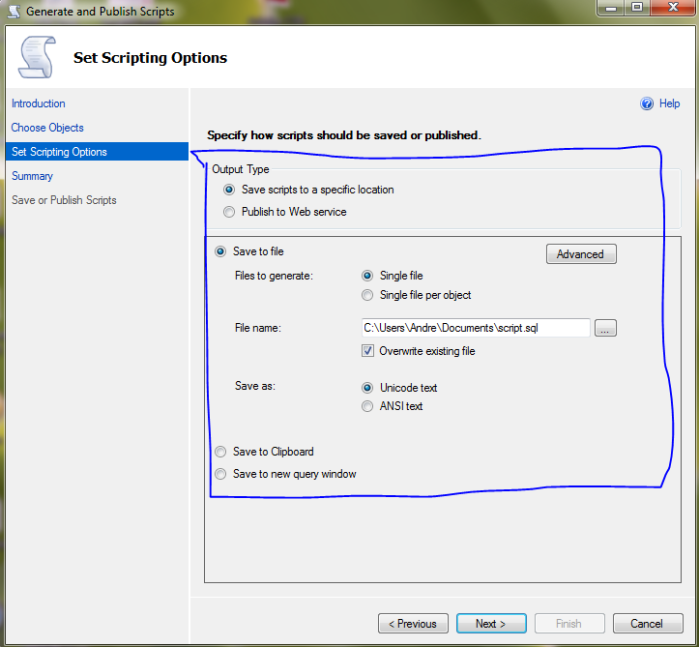
Microsoft SQL 2008 Generate script for the whole database

Today I come across a task that require me to backup all the scripts in ms sql server 2008 R2. I take a look at all possibilities then come into this solution:

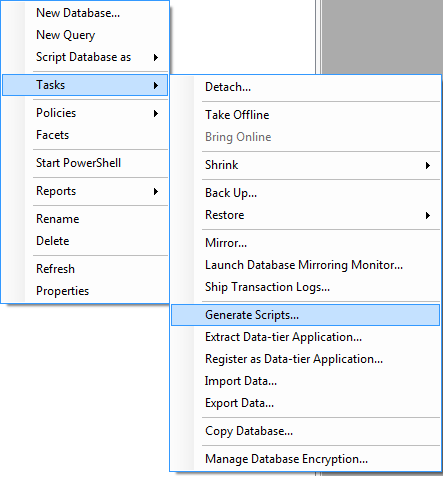
1. Right Click the database that we wish to generate script from, then select -> tasks -> generate scripts…

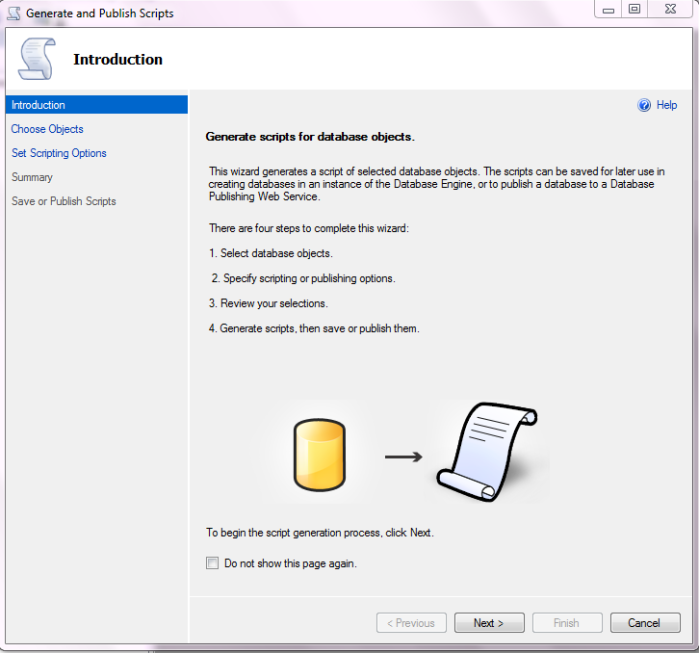
2. Then it will open up the wizard to create the script

3. We also can specify the script for whole database or even to specific tables/stored procedures

4. Other than that we also can specify our preferred output type

CRM 4.0 Deployment Problem – web.config cannot be loaded properly

Today I developed an application to be deployed in ISV. However as per request I couldn’t use the default organization,
so I need to change the url from:
http://(server-name)/ISV/(app-name)
to:
http://(server-name)/(organization-name)/ISV/(app-name)

The problem is my current web.config couldn’t be loaded properly. I got empty configuration even I use existing configuration from other project that use the same CRM.
After a chat with my work mate, he come accoss to Janne Mattila’s blog and I found the solution.

That’s a relief, yet not the end of the problem. I have a project that contains all CRM functions there. The solution above only applicable if I use those functions in one project, unfortunately I use it accross several projects.
So after some time and a chat with my work mate again we come into a solution:

1. I create a function in the config class that I use for the projects

public static void LoadCustomConfigFile()
{
// open the configuration on this specific path
Configuration configuration = WebConfigurationManager.OpenWebConfiguration("/ISV/");

// get all configuration that starts with "Crm" keyword - use "Crm" keyword for Crm related settings
var crmConfigurationKeys = configuration.AppSettings.Settings.AllKeys.Where(k => k.StartsWith("Crm")).ToList();

foreach (var crmKey in crmConfigurationKeys)
{
ConfigurationManager.AppSettings.Set(crmKey, configuration.AppSettings.Settings[crmKey].Value);
}
}

2. On page load event in the ISV application

protected void Page_Load(object sender, EventArgs e)
{
// Load custom config
Config.LoadCustomConfigFile();

// do the rest of page load event
}

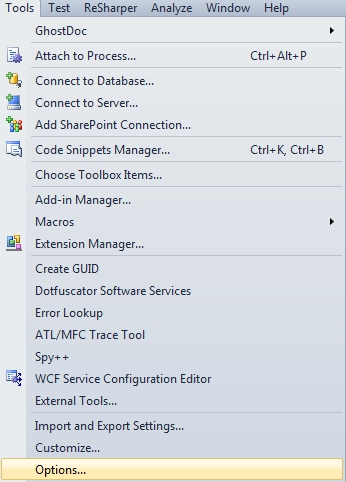
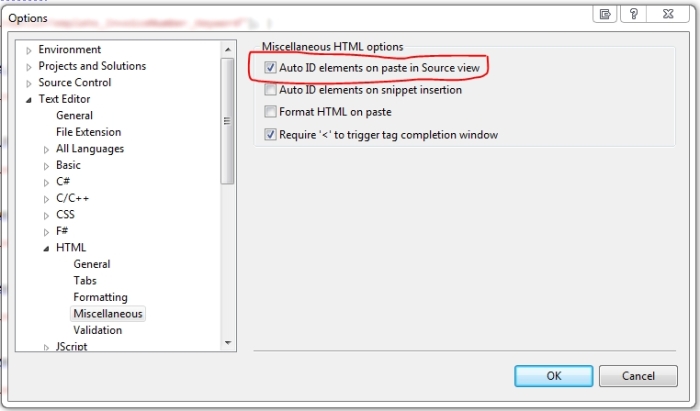
How to disable auto creation of ID in Visual Studio 2010

How many of us encounter problem with Visual Studio that automatically change the ID of the controls that we copy-paste in our projects.
Luckily I found the solution for this trouble maker. We need to change it through Visual Studio’s option.

First go to Tools => Options

Then Under TextEditor => HTML => misc, uncheck:

DROP TABLE IF EXIST in MS SQL

MS SQL equivalent to DROP TABLE IF EXIST

When developing an application using MySQL I generally use this syntax:


DROP TABLE IF EXISTS [table_name];
CREATE TABLE [table_name] ( Columns declaration here )

This sql script is useful when I’m about to clear out the data in a table. However in Microsoft SQL (MS SQL) this method will not work.
After I do some searching, I come up with this syntax:


IF EXISTS (SELECT * FROM sysobjects WHERE id = object_id(N'[dbo].[table_name]')
AND OBJECTPROPERTY(id, N'IsUserTable') = 1)
DROP TABLE [dbo].[table_name];
CREATE TABLE [dbo].[table_name] ( Columns declaration here );

The above sql script will be equivalent to MySQL syntax before. Hope this will be helpful 🙂

Config Files in ASP.Net

I think this is a beginner subject of ASP.Net development, however I somewhat miss this thing when I was learning ASP.Net in Uni…

When we creating an ASP.Net web application, sometimes we create other projects under the same solution to handle business logic or other relevant classes. And sometimes we want to create the application config file on that respective project. However that project is not an executable project.. So I confused and asking myself for about an hour to think.. Why the value that I retrieve from the config file (App.config) always null??

The reason is: I put the config file on the project that has no executable, so when I debug and run the solution, it automatically call the web application and all of the config that used is the config of web (which is Web.config).

So instead of using the config file from specific project that does not have executable at all, I should use and set the keys config file where the project is executable.

handling jQuery on ASP.NET ID

jQuery is a very powerful library for making good interaction on your web application. However in ASP.Net development environment there is a problem that I found when selecting the ID of an ASP.Net control.

Usually we can select the id of specific html tag by using this

$(document).ready(function(){
$('#IDofSpecificTag').click(function() {
// do implementation here
)};
});

But when we want to access the ID of ASP.Net Control we cannot simply select the ID of the control, as when it rendered in html page (after it compiled) it will have some attachment (prefix) on the id.
For example, my asp:textbox with id txtBarcode it renders as ContentPlaceHolder1_txtBarcode in the generated html.

The Solution:

$(document).ready(function(){
$('# <%=
IDofSpecificTag.ClientID %>').click(function() {
// do implementation here
)};
});

OR


$(document).ready(function(){
$("*[id$='IDofSpecificTag']")..click(function() {
// do implementation here
)};
});

I prefer the first solution as it is very simple in implementation, however it is not very good practice to mix up between ASP.Net tag with javascript..
I hope this will be useful for people who are still learning how to use jQuery in ASP.Net 🙂

Oracle Auto Increment ID

Oracle does not support the auto increment automatically. We need to create sequence and trigger before.

Sequence creation:

CREATE SEQUENCE sequence_name
MINVALUE value
MAXVALUE value
START WITH value
INCREMENT BY value
CACHE value;

example:

CREATE SEQUENCE book_sequence
MINVALUE 1
MAXVALUE 999999999999999999999999999
START WITH 1
INCREMENT BY 1
CACHE 20;

Trigger Creation:

CREATE OR REPLACE TRIGGER <trigger name> BEFORE INSERT ON <table name> REFERENCING NEW AS NEW FOR EACH ROW BEGIN SELECT <sequence name>.nextval INTO :NEW.<id from table> FROM dual; END;

example:

CREATE OR REPLACE TRIGGER "BOOK_TRIGGER" BEFORE INSERT ON book REFERENCING NEW AS NEW FOR EACH ROW BEGIN SELECT book_sequence.nextval INTO :NEW.BOOKID FROM dual; END;

That’s all hopefully it’s helpful..

Basic AJAX

I found this function to load a document via ajax. It enables people to do web task without reloading the page

function loadXMLDoc(url)
{
if (window.XMLHttpRequest)
{// code for IE7+, Firefox, Chrome, Opera, Safari
xmlhttp=new XMLHttpRequest();
xmlhttp.open(“GET”,url,false);
xmlhttp.send(null);
}
else
{// code for IE6, IE5
xmlhttp=new ActiveXObject(“Microsoft.XMLHTTP”);
xmlhttp.open(“GET”,url,false);
// Do not send null for ActiveX
xmlhttp.send();
}
document.getElementById(‘test’).innerHTML=xmlhttp.responseText;
}