Help(ing you) in Deciding Microsoft Dynamics CRM 2015 Custom Help Implementation

Last couple of weeks ago myself and Elaiza Benitez are collaborating in writing up some posts for the new custom help feature introduced in Dynamics CRM 2015: Help(ing you) in Microsoft Dynamics CRM 2015 with Microsoft Word and Help(ing you) in Microsoft Dynamics CRM 2015 using Office 365 and Microsoft SharePoint online. In the previous posts we mentioned the ways to implement custom help in Dynamics CRM 2015. Custom help is really important aspect in user adoption where the end users (who use the system) can find a guidance on how they will work with the system without the need to contact the trainers or support help desk to solve their lack of knowledge, especially when the organisation just rolled-out a brand new CRM system.

So, in this post I will share my thought on how we could compare the approach and get which one as the best fit to the situation. The first part that drives the decision is whether we would like to implement the custom help globally or per-entity based. Now let’s compare the pros and cons of each implementation and I will give my thought on what would be the typical scenario where the approach will be suitable/applicable.

Global Custom Help

Global custom help is applied system wide, regardless whether an entity is system entity (out of the box) or custom entity, when this functionality is enabled every time the user clicks on the help icon, they will see the custom help instead of the standard out of the box Dynamics CRM help page. Global custom help option might works the best with the next option (Append parameters to URL) so that the help site can redirect or point to the right resource. One of the sample of the implementation with minimum amount of code is covered by Scott Durow in this post. Now below is the analysis on the implementation:

Typical usage for:

  • Organisation wide implementation that has lots of custom entities and renamed most of the system entities, with minor or no 3rd party solutions involved.
  • Requires a centralised location to manage the help content (SharePoint for example).
  • Works well for an implementation where you have high level ownership of the system.

Pros compared to entity-based custom help:

  • Centralised location of help settings (system-wide settings).
  • Easier to maintain the content (will always be in the same location, depends on your routing/pointing logic).
  • Depends on the implementation, non-solution aware help might be helpful if you want to give different help content to a different instances.

Cons compared to entity-based custom help:

  • Not solution aware, needs a bit of admin task to make sure each CRM environment has pointed to the right help content.
  • You could not pick and choose on which entity that you would like to implement the custom help, which leads to the need to provide the content for each entities that you have in CRM (more work to be taken care of).
  • In alignment with the above point, you need to make the help content for each new custom entity created.

Entity-Based Custom Help

Entity-based custom help is applied on per entity basis. So you could specify on which entity the custom help will be applied. In implementing entity based custom help there are many options available, such as using CRM web resource, external web CMS/SharePoint or any other web pages that available to your users (intranet/public site).

Typical usage for:

  • ISV vendors to point the help content to your website knowledge article.
  • Small implementation that has minor customisation.

Pros compared to global custom help:

  • Solution aware, no changes required wherever the solution is deployed.
  • Tailored for each entity, no need to route the help to the specific topic/entity.
  • Have the flexibility to implement only to certain entity (ability to pick and choose).

Cons compared to entity-based custom help:

  • Need to configure the custom help on each entities that you would like to have the custom help (with greater flexibility there is more responsibility).
  • The help content can be scattered all over the place (e.g: help content for entity A is in SharePoint, however the content for entity B is in web resource).

Mixed Approach

You could mix the usage of global and entity-based custom help. The behaviour is the Entity-Based custom help will win. Example: You provide the global custom to http://www.bing.com/ (so the user know how to use search engine 🙂 ) and specified the custom help for contact entity to your SharePoint page. So, when users click to open the help on other entity for contact, they will see http://www.bing.com/. And when they open the help page on contact, they will see the SharePoint page.

This behaviour is useful when you would like to have a default location for custom help, but for certain entity the help will be given specifically. This is in accordance with ISV mindset that their content will be displayed wherever their solution are deployed.

Conclusion

I hope my thought can help-ing you in deciding the custom help implementation, please feel free to comment and add some ideas/feedback 🙂

Unsupported Customisation: Importing CRM 2011 Managed Solution to CRM 2015

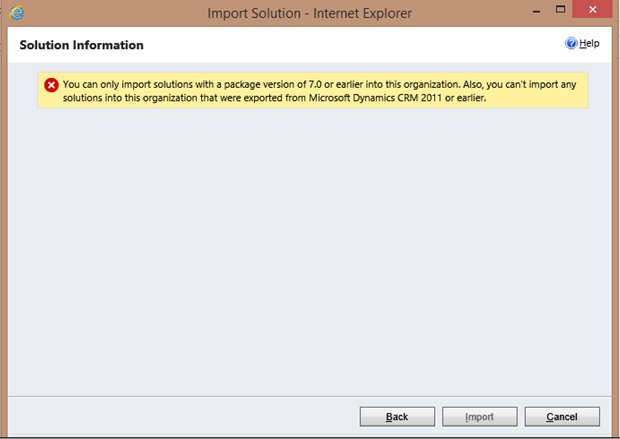
Recently I worked on a piece of demo that requires a solution from codeplex with a solution file that have not been updated for CRM 2015. What I have left is the CRM solution that the author exported from CRM 2011 and what I have for the demo environment is a new CRM Online tenant that based on CRM 2015. While I could reverse engineer of the author’s works to fit into CRM 2015 solution (thanks to the author that providing the source code in Codeplex), but what I would like to know is whether the customization will works fine in CRM 2015 or not. So for testing I would like to import it into my demo org. As I posted before on the CRM solution compatibility matrix, CRM solution that exported from CRM 2011 definitely could not be imported to CRM 2015. This will throw an error as “You can only import solutions with a package version of 7.0 or earlier into this organization. Also, you can’t import any solutions into this organization that were exported from Microsoft Dynamics CRM 2011 or earlier.

Given I know the content of the solution majority are just web resource items, such as html pages, javascript files and CSS files, plus the customization still follow CRM 2015 best practice, the problem just coming from the solution that contain these items was exported from CRM 2011. So, after thinking a while and reading through each components of the solution, I found out that the component that restrict the solution import was coming from the version and SolutionPackageVersion attributes in ImportExportXml element in solution.xml. So, I tried to change it with the value that I derived from a CRM 2015 solution:

<ImportExportXml version="7.0.0000.4013" SolutionPackageVersion="7.0" languagecode="1033" generatedBy="CrmLive" xmlns:xsi="http://www.w3.org/2001/XMLSchema-instance">

Voila, now I could get the CRM 2011 solution to be imported to my CRM 2015 environment.

NOTE: Don’t ever try this for production environment and I share this only for testing/demo purpose only. Please always use the supported customization way.

New Data Integration Tool: Skyvia – Salesforce to Dynamics CRM Data Migration Revisited

Recently I’ve been introduced to a new data integration tool named Skyvia. So, I think it’s a good idea to give it a try and some review, given it is a free tool (at this moment, not sure whether they are going to go with licensing in future).

Skyvia is cloud based data integration service that has multiple connectors to multiple cloud CRM platforms, such as: Dynamics CRM, Salesforce, Zoho and SugarCRM and also cloud storage, such as Dropbox, Google Drive (unfortunately OneDrive is not there yet) and SQL Server.

So, when I tried to give it a go, I found it quite simple and intuitive to use.

There are 4 operations (called package) that Skyvia supports:

  1. Import
  2. Export
  3. Replication
  4. Synchronization

So, in my case I revisited my post on migrating from Salesforce to Dynamics CRM using this tool.

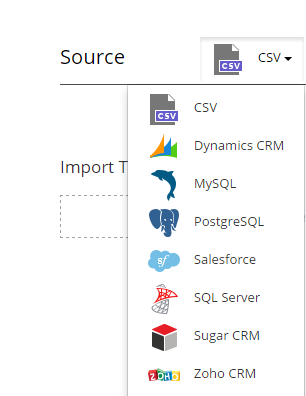
To get started, I create a new import package, for the Source component, this tool has these following options:

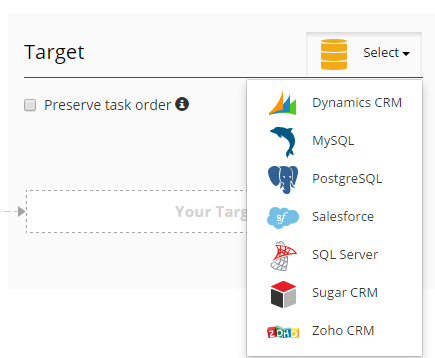
And for the Target component, this tools has these following options:

Select both Source and Target components, in this case I chose Salesforce as the source and Dynamics CRM as the target, enters the credentials for both components.

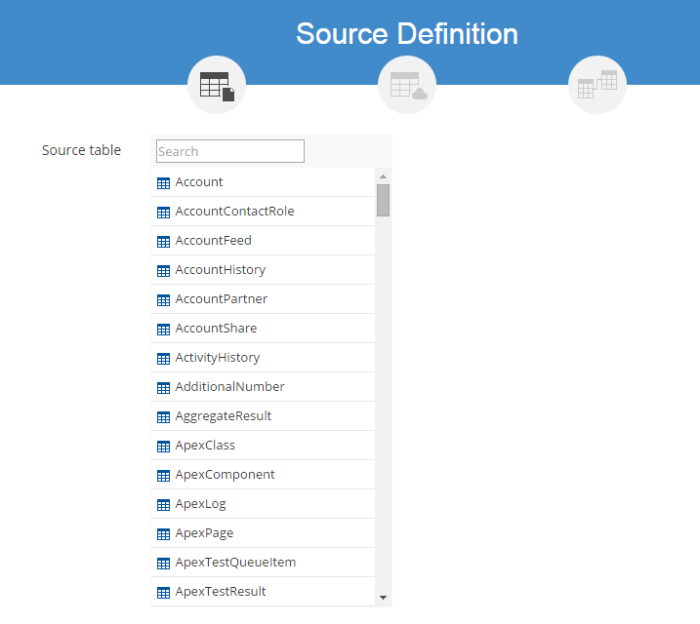
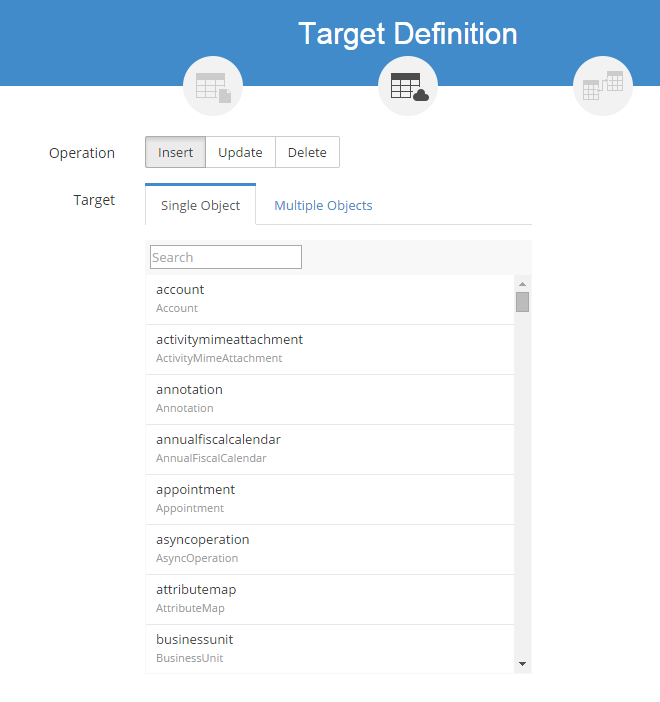
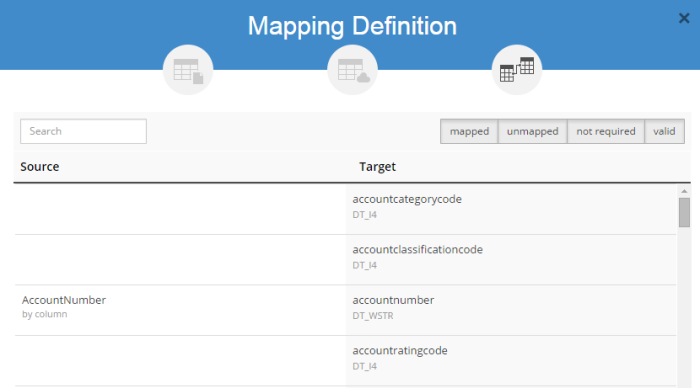
Then click on “Create New Task” button to configure the process. It will open up the configuration “Wizard” that will go through the source and target component mapping as the following screenshots. For sample purpose, I tried with Account object (entity):


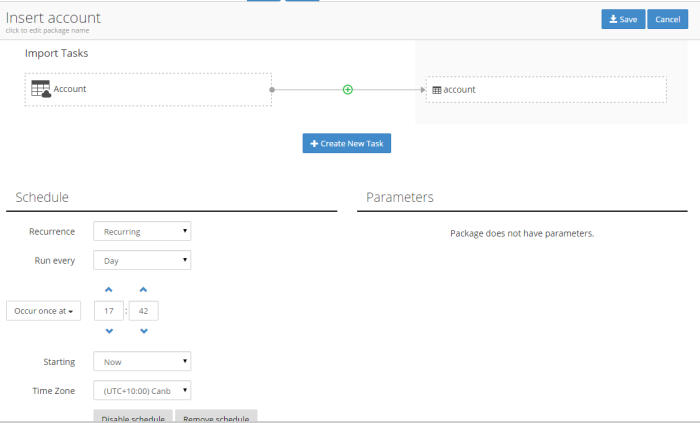
Once the task configured, it’s the time to configure the schedule:

Once everything configured properly, click on Save button to keep the changes.

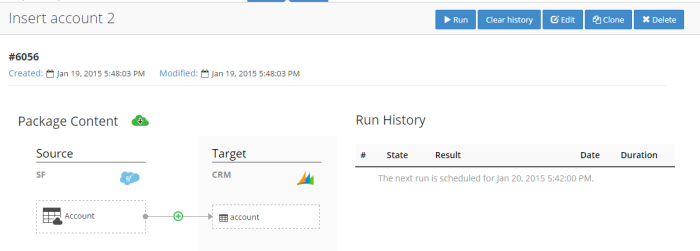
Once the process kicks in or executed manually by clicking “Run” button, it will log the process under Run History table

So I just double check on my Dynamics CRM instance, there are new records that come from Salesforce!

Edit: For more detailed technical documentation that will give clearer understanding of each configurations: http://skyvia.com/resources/docs/index.html

In conclusion, this is a good tool for simple cloud data migration/integration, however for more complex requirements I still need more advanced tools such as SSIS + Connector or Scribe.

Tips on Working with Dynamics CRM 2015 Calculated and Rollup Fields

Dynamics CRM 2015 release brings a rich tool for system customizers to be able to do their work with less dependency with code. The most useful features in Dynamics CRM 2015 is the Calculated and Rollup Fields.

First of all there are some good post from fellow MVPs regarding these new features:

Calculated Fields (by Leon Tribe): http://blogs.msdn.com/b/mvpawardprogram/archive/2014/12/15/dynamics-crm-2015-calculated-fields.aspx

Rollup Fields (by Jukka Niiranen): http://niiranen.eu/crm/2014/12/analyzing-customer-behavior-data-crm-2015-rollup-fields/

So, I did my hands on with these new features to test and found out that some limitations in regards these new features:

  1. Currently there is no way to upgrade/update existing fields (Simple) to calculated or rollup fields. This situation could be common when there are some fields that calculated through other methods before (plugin/WF/js) that would like to be updated with the new functionality.
  2. The calculated or rollup fields need to be created first in metadata before it could be configured. Therefore if the configuration process was not completed during the creation of the fields there is potential “orphan” calculated/rollup fields that do nothing.
  3. The rollup fields are calculated asynchronously through the system job, therefore there will be some delay to get these fields to be calculated.

I hope this helps!

Whitelist Addresses Used By Microsoft Dynamics CRM

Recently I’m working in an environment that controlled their network access through a proxy server. When I’m going to test some feature of CRM 2013 on CRM online, I could not be authenticated properly. So, after a quick discussion, apparently it is caused by some of the URL addresses that used by Dynamics CRM is blocked in the proxy settings. So, in case anyone encounter similar situation, the list described in this KB article might help: http://support.microsoft.com/kb/2655102

North America based organizations:
http://clientconfig.passport.net/ppcrlconfig.bin
• http://disco.crm.dynamics.com
https://login.live.com
https://dev.crm.dynamics.com
http://crl.microsoft.com/pki/crl/products/microsoftrootcert.crl
https://online.dynamics.com
https://mbs.microsoft.com
https://go.microsoft.com
• .windows.net
• 
.microsoftonline.com

South America based organizations:
• http://disco.crm2.dynamics.com
https://dev.crm2.dynamics.com
http://crl.microsoft.com/pki/crl/products/microsoftrootcert.crl
https://online.dynamics.com
https://mbs.microsoft.com
https://go.microsoft.com
• *.windows.net
• *.microsoftonline.com

Europe, Africa and Middle East based organizations:
http://clientconfig.passport.net/ppcrlconfig.bin
https://login.live.com
https://dev.crm4.dynamics.com
http://disco.crm4.dynamics.com
http://crl.microsoft.com/pki/crl/products/microsoftrootcert.crl
https://online.dynamics.com
https://mbs.microsoft.com
https://go.microsoft.com
• .windows.net
• 
.microsoftonline.com

Asia / Pacific area based organizations:
http://clientconfig.passport.net/ppcrlconfig.bin
https://login.live.com
https://dev.crm5.dynamics.com
http://disco.crm5.dynamics.com
http://crl.microsoft.com/pki/crl/products/microsoftrootcert.crl
https://online.dynamics.com
https://mbs.microsoft.com
https://go.microsoft.com
• .windows.net
• 
.microsoftonline.com

Dynamics CRM 2013 SP1 Plugin Registration Tool Revamped!

Today I checked the Dynamics CRM forum to answer some of the questions there. One of the question that I tried to answer was regarding the plugin registration tool. The screen shot that uploaded by the question shows different UI of plugin registration tool that I usually use.

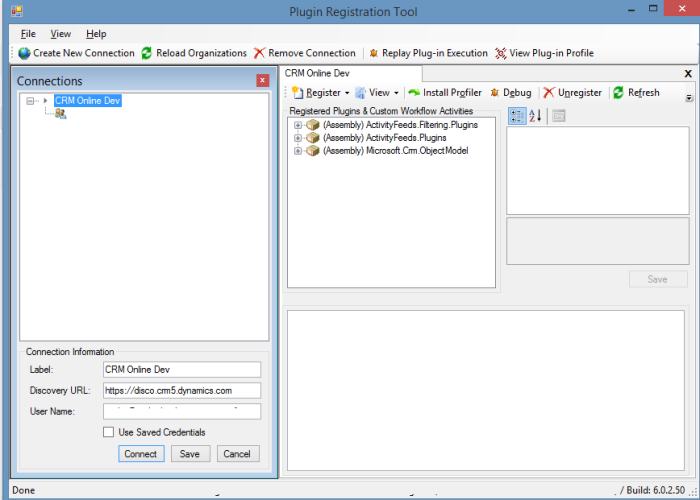
Then I check the latest SDK for Dynamics CRM 2013 SP1 (6.1): http://www.microsoft.com/en-au/download/details.aspx?id=40321. The SDK now provides the new Registration Tool under Tools > Plugin Registration (No longer in the “Bin” folder)

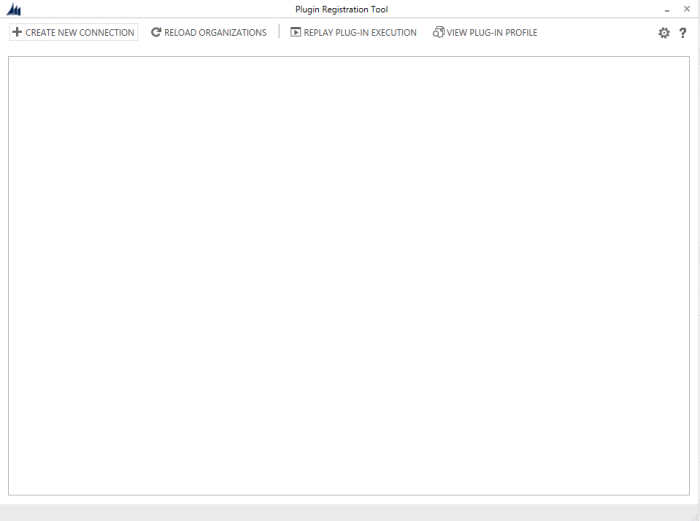
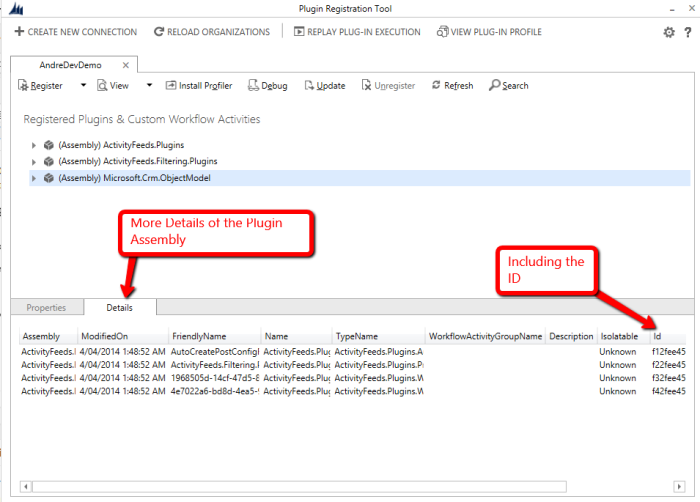
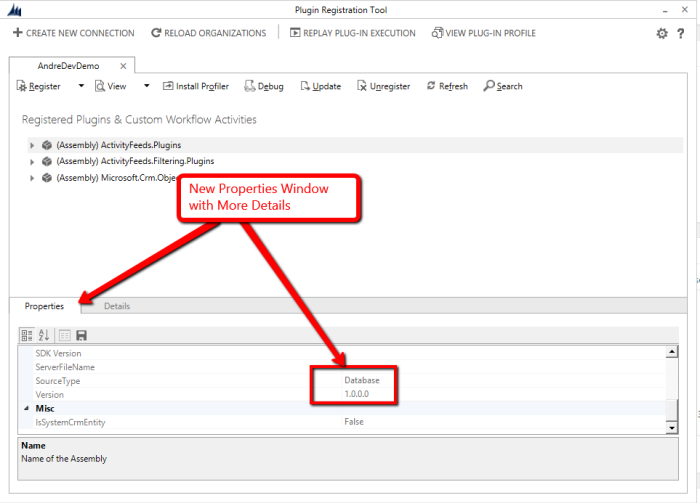
Below is the comparison of the old & new layout of the plugin registration tool:

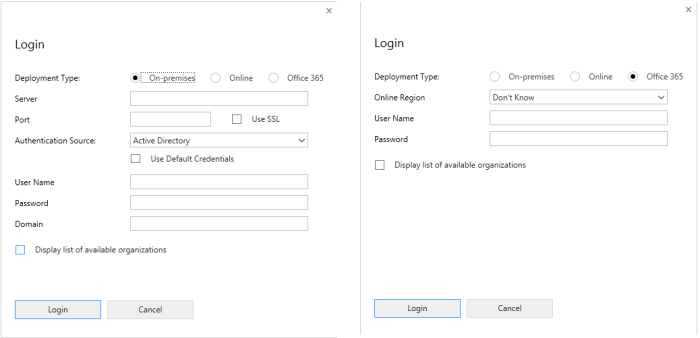
The new Tool definitely is no longer using Windows Form Application. The new tool has different authentication method than the old tool, where we don’t need to specify the discovery URL (where we usually need to go to Settings > Customization > Developer Resource):

The Online Region Selector now helps us to construct which CRM discovery server to be connected to (where crm5 is my region):

Overall functionality of the tool does not change. There are some details that added to the new Plugin Registration tool

One thing that made me curious is the usage of the “Gear” button (usually it’s setting) that cannot be clicked. Perhaps it’s a bug??


Dynamics CRM 2013 Certification is Available on Prometric


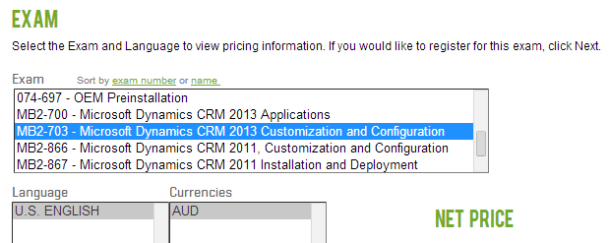
Today I found the new certifications for CRM 2013 on Prometric website when I was checking my previous exam result.


Looking forward to do the MB2-703 – Microsoft Dynamics CRM 2013 Customization and Configuration. The exam currently only available in English.

Styling Emails with CSS – ClickDimensions blog

This is a re-post from:

http://blog.clickdimensions.com/2013/09/styling-emails-with-css.html

on how to make styling for email templates in Dynamics CRM. This is really helpful approach. And remember, table-layout! Email is not website.

Dynamics CRM 2013 [Beta] Exciting Part! Process Form & Business Rules Everywhere!

I’m lucky enough to get a hands-on with the new Dynamics CRM 2013 Beta from my current company as part of partner readiness.

The features that I really love from this new update are: Process Form & Business Rules!

What is Process Form? This update was released on CRM Online version in Dec 2012, around the same time as the release of UR 12 (Exciting multi-browsers support). This feature is helping sales process to keep track with each stage of a form. And now it’s available everywhere on every entity (as far as I can see in this beta release)!

Next is Business Rule. What is it? This is an amazing feature to implement business logic on certain entity. We could build our validation rule on the form, field update, hide/show part within form, make field editable based on certain values and many more awesome functionality and it is bound to solution! From developer point of view, this will reduce the time to do form scripting (reduce testing time when there is bug/wrong logic in the js)

Would this replace plug-in or workflow functionality? To certain extent it may.

I’ll keep updating this post with screenshots and more detailed features.

New Journey (Part 1)

Recently I decided to learn more about IT Infrastructure, especially on Dynamics CRM deployment and installation. And also installation of SharePoint Server, currently planning on installing 2010 and 2013 on different VMs. 

First step on my journey in installation of these servers is:

Prepare Active Directory for all servers to authenticate. Give my credit to howtogeek.com by providing such great step-by-step tutorial on: http://www.howtogeek.com/99323/installing-active-directory-on-server-2008-r2/

This is the content of the tutorial:

Active Directory is essential to any Microsoft network built on the client-server network model–it allows you to have a central sever called a Domain Controller (DC) that does authentication for your entire network. Instead of people logging on to the local machines they authenticate against your DC. Lets take a look at how to install Microsoft’s Active Directory.

Installation

Open Server Manager and click on roles, this will bring up the Roles Summary on the right hand side where you can click on the Add Roles link.

This will bring up the Add Roles Wizard where you can click on next to see a list of available Roles. Select Active Directory Domain Services from the list, you will be told that you need to add some features, click on the Add Required Features button and click next to move on.

A brief introduction to Active Directory will be displayed as well as a few links to additional resources, you can just click next to skip past here and click install to start installing the binaries for Active Directory.

When the installation is finished you will be shown a success message, just click close.

Configuration

Open up Server Manager, expand Roles and click on Active Directory Domain Services. On the right hand side click on the Run the Active Directory Domain Services Installation Wizard (dcpromo.exe) link.

This will kick off another wizard, this time to configure the settings for you domain, click next to continue.

The message that is shown now relates to older clients that do not support the new cryptographic algorithms supported by Server 2008 R2, these are used by default in Server 2008 R2, click next to move on.

Choose to create a new domain in a new forest.

Now you can name your domain, we will be using a .local domain the reason why will be explained in an upcoming article.

Since this is the first DC in our domain we can change our forest functional level to Server 2008 R2.

We want to include DNS in our installation as this will allow us to have an AD Integrated DNS Zone, when you click next you will be prompted with a message just click yes to continue.

You will need to choose a place to store log files, it is a best practice to store the database and SYSVOL folder on one drive and the log files on a separate drive, but since this is in a lab environment I will just leave them all on the same drive.

Choose a STRONG Active Directory Restore Mode Password and click next twice to kick off the configuration.

You will be able to see what components are being installed by looking in the following box.

When its done you will be notified and required to reboot your PC.

That’s all  there is to it guys, now you have a working installation of Active Directory.

MS CRM 2011 – Hiding a Group of Ribbon on Specific State

Today I come up with another task to only show the button on a group only when the record has already been saved.
After some times reading at the CRM 2011 SDK documentation and some time searching for clue, I found a solution.


The above pictures are the desired result. The button should be shown after the record has been saved.

So the changes to the Ribbon XML can be like this:

<RibbonDiffXml><CustomActions>  <CustomAction Id="Mscrm.ISV.campaignresponse.CustomGroup.MaxSize.CustomAction" Location="Mscrm.Form.campaignresponse.MainTab.Scaling._children" Sequence="150"><CommandUIDefinition>  <MaxSize Id="Mscrm.ISV.campaignresponse.CustomGroup.MaxSize" GroupId="Mscrm.ISV.campaignresponse.CustomGroup.Interaction" Sequence="21" Size="LargeLarge" /></CommandUIDefinition>  </CustomAction>  <CustomAction Id="Mscrm.ISV.campaignresponse.CustomGroup.CustomAction" Location="Mscrm.Form.campaignresponse.MainTab.Groups._children" Sequence="115"><CommandUIDefinition>  <Group Id="Mscrm.ISV.campaignresponse.CustomGroup.Interaction" Command="Mscrm.Enabled" Title="Interaction" Sequence="85" Template="Mscrm.Templates.3.3" ><Controls Id="Mscrm.ISV.campaignresponse.CustomGroup.Controls">  <Button Id="Mscrm.ISV.campaignresponse.Form.Interaction.Button.AddGuest"Command="Mscrm.ISV.campaignresponse.Form.Interaction.Command.AddGuest"ToolTipTitle="Tip"ToolTipDescription="Add Guest"LabelText="Add Guest"Alt="Add Guest"Image16by16="/_imgs/ribbon/AssignRoles_16.png"Image32by32="/_imgs/ribbon/AssignRoles_32.png"TemplateAlias="o1" /></Controls>  </Group></CommandUIDefinition>  </CustomAction></CustomActions><Templates>  <RibbonTemplates Id="Mscrm.Templates"></RibbonTemplates></Templates>  <CommandDefinitions>  <CommandDefinition Id="Mscrm.ISV.campaignresponse.Form.Interaction.Command.AddGuest"><EnableRules></EnableRules><DisplayRules>  <DisplayRule Id="Mscrm.ISV.campaignresponse.CustomGroup.Interaction" /></DisplayRules><Actions>  <Url Address="$webresource:pages/addGuests" PassParams="true"/></Actions>  </CommandDefinition>  </CommandDefinitions><RuleDefinitions>  <TabDisplayRules />  <DisplayRules><DisplayRule Id="Mscrm.ISV.campaignresponse.CustomGroup.Interaction">  <FormStateRule State="Create" InvertResult="true" /> <!-- THIS IS THE TRICK --></DisplayRule>  </DisplayRules>  <EnableRules /></RuleDefinitions><LocLabels /></RibbonDiffXml>